Filled via-in-pad processes are a way to achieve an intermediate density increase for a minimal additional cost.
In PCB design, via refers to a plated hole that connects copper
tracks from one layer of the board to other layers. High-density
multilayer PCBs may have blind vias, which are visible only on one
surface, or buried vias, which are visible on neither and are normally
referred to as microvias. The advent and extensive use of finer pitch
devices and requirements for smaller size PCBs creates new challenges.
An exciting solution to these challenges uses a recent, but common PCB
manufacturing technology with a self-descriptive name: via-in-pad.
Via-in-pad
technology is becoming a more essential and efficient strategy. With
certain parts, the component manufacturer strongly recommends it.
However, surface-mount assembly engineers like vias placed away from
component lands to prevent solder migration. Increases in board
thickness due to higher I/O array packages complicate these issues as
larger holes and pads may be required to maintain through-hole
reliability.
Other design factors such as placing
passive devices directly under packages are creating the need for
improved via-in-pad technology. Many designers are searching for
solutions to these complex issues. This article covers some key
guidelines for properly performing via-in-pad design.
Via-in-Pads and BGAs
Via-in-pad
helps to reduce inductance, increase density and employ finer-pitch
array packages. The via-in-pad approach places a via directly under the
device’s contact pads. This allows higher component density and
improved routing. Consequently, via-in-pad provides the designer
significant PCB space savings. For example, traditional fan-out places
four components, whereas with via-in-pad, six components can be placed
within the same board outline (FIGURE 1).
|

FIGURE 1.
Via-in-pad provides designers significant PCB space savings. In this
figure, traditional fan-out places four components, whereas with
via-in-pad, six components can be placed within the same board outline.
|
To
illustrate the routing advantages of via-in-pad design, consider the
traditional PCB approach of connecting a via to a pad with a dog-bone
pattern as shown in FIGURE 2.
|

FIGURE 2. The traditional PCB approach of connecting a via to a pad with a dog-bone pattern.
|
When
BGAs incorporate via-in-pad, the need for dog-bones between via pads
and the BGA land is removed. In addition, passive components can be
placed directly over the vias on the bottom side of the BGA, reducing
inductance, rather than outside the perimeter of the BGA (FIGURE 3). A small increase in density is realized by being able to route a few signals out on the surface as well.
|

FIGURE 3.
Passive components can be directly placed over the via on the bottom
side of a BGA, reducing inductance rather than outside the BGA’s
perimeter.
|
Solder Void Formation
With
those design benefits aside, via-in-pad can, unfortunately, be the
reason for solder void formation. That’s the reason surface-mount
design engineers do not like to see via-in-pad designs because it
impacts reliability and yield. With the via hole located in the center
of the pad, there is a probable increase in voiding. Voiding decreases
as the via hole is moved further away from the center of the pad. Via
hole size has a dramatic affect on void formation. The smaller the via
size, the lower the chance of void formation. Also via hole layer depth
proves to have a large impact on void formation. The deeper the hole
(via between extreme layers), then there is a greater chance of a more
solid void.
Via-in-pad causes issues at assembly and
subsequent adverse effects on PCB assembly reliability. Placing
standard through vias (no solder mask coverage) in a solderable pad
leads to solder loss down a via resulting in a starved solder joint. If
the through vias are capped or flooded with solder mask, then air will
be trapped inside the via with solder mask on one side and solder paste
on the other.
During IR (infrared) reflow, the air
will expand and blow the solder mask off the other side. Via-in-pad can
make false opens during ICT (in-circuit testing) if the top of the via
is in a solderable land and the bottom in a test pad; the lost solder
creates a bump and results in a false open. Either option creates
challenges in assembly, as will using deep blinds in solderable lands.
Using via fill with via-in-pad designs results in no entrapped air
during assembly.
Filled: Via-in-Pad
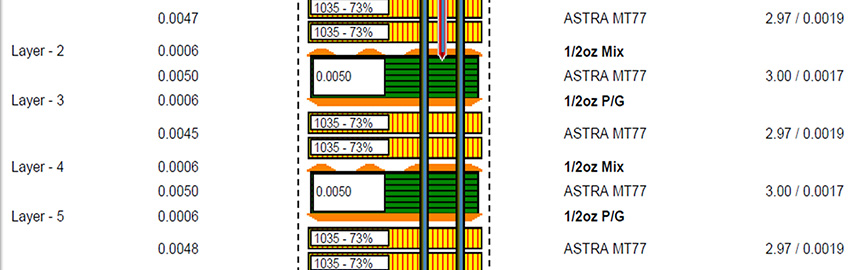
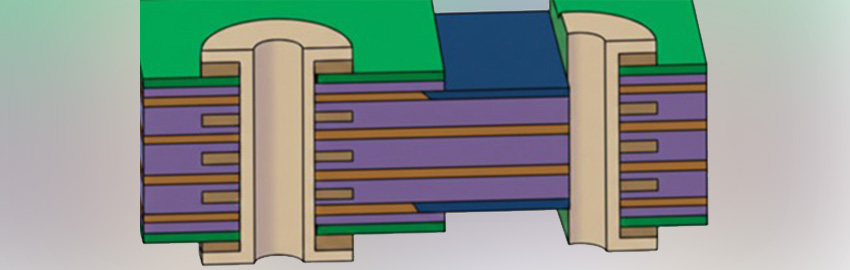
Via-in-pad with a conductive or non-conductive fill material is normally referred as via fill (FIGURE 4).
Vias are drilled and copper plated, then filled with a polymer
consisting of a blend of copper and epoxy for a non-conductive option
or copper, silver, and epoxy for a conductive option. Once vias are
filled, cured and planarized, the remaining plated holes are processed.
|

FIGURE 4. Via-in-pad with a conductive or non-conductive fill material is referred to as via fill.
|
This
yields a flat copper plated cap over the vias, which facilitates
component attachment. The reason is to completely fill the via with a
material with essentially no voids so that the surfaces are nearly
flat. This material is usually plated over with copper during the
through-hole plating process for the non-filled holes. If the desire is
to have the vias filled to prevent solder drain, then the filling
method needs to be defined. In most applications, the non-conductive
material will meet the needs of the application and is less expensive
than the materials filled with silver or gold.
Methods for Via Fill
It
is important for the PCB designer to have clear communication with the
board fabricator about via-fill requirements. Otherwise, ambiguities
and misunderstandings arise. The following are the common materials
used for solder mask, via plugging or capping, and via filling.
Primary
solder mask is the first application of liquid photo imageable (LPI)
solder mask applied by flood, roller or curtain coat to the PCB. It is
later photoprinted (exposed), developed and cured. It usually covers
the entire board surface except for holes, lands and grounding rails.
Solder
mask applied on specific PCB areas, usually to cover open vias, is
referred to as secondary solder mask. This second application of solder
mask is usually completed using an imaged screen mesh. It is more solid
than LPI solder mask. However, it is still expected to shrink during
the curing process.
The most commonly used term on
fabrication drawings is via plugging. It is used when the vias need to
be partially or fully filled with some type of material (FIGURE 5). The term via plugging has been used by various designers and covers all of the plugging/filling methods.
|

FIGURE 5. Via plugging is used when vias need to be partially or fully filled with some type of material.
|
Solder
mask encroachment is the least expensive alternative, as it only
affects the primary solder mask artwork. No secondary solder mask or
other filling material is required. Solder mask encroachment is when
the primary solder mask has an opening for a via that is larger than
the finished hole size and yet smaller than the via pad diameter. This
is commonly used to reduce the amount of solder shorts during assembly.
There are many designs where solder mask encroachment without via
plugging is sufficient for high yields during assembly. The rule of
thumb for this approach is if you encroach your vias, you should
measure from pin to encroachment area. The formula used here is for a
minimum 3-mil encroachment:
Pad size diameter –
Solder mask opening diamter of greater than or equal to 6 mils,
provided the solder mask opening diameter is not < the drill size
(nominal hole size + 3 mils).
For example: 16 mil pad - 9 mil solder mask opening = 7 mil, i.e. greater than 6 mils.
This should give you enough pin to via/encroachment (copper to copper) clearance for your assembler.
Via
cap is a secondary solder mask application that covers vias and via
pads on the top or bottom sides of the board (not both) after the
conductor surface finish is applied (FIGURE 6). It
only puts a small amount of solder mask in the barrel of the hole. It
is intended to cover the via pad, and most of the vias will have solder
mask spanning the opening of the hole.
|

FIGURE 6.
Via cap is a secondary solder mask application that covers vias and via
pads on top or bottom sides of the board (not both) after the conductor
surface finish is applied.
|
Flooded or tented vias provide no aperture in the primary solder mask for the vias on the top and/or bottom side of the board (FIGURE 7).
The vias are neither capped nor encroached during primary solder mask
application. Since the LPI solder mask has a relatively low percentage
of solids, it will shrink and crack during the cure process, providing
a location to entrap chemistry and fluxes. However, this process has
reliability and assembly issues for most applications.
|

FIGURE 7.
Flooded or tented vias don’t provide an aperture in the primary solder
mask for vias on the top and/or bottom side of the board.
|
Conclusion
Filled
via-in-pad is a way to achieve intermediate density with an
intermediate cost compared to using blind/buried vias. To summarize,
the advantages associated with using the via-in-pad technology are:
- Fan-out, fine-pitch (less than 0.75 mm) BGAs
- Meets closely packed placement requirements
- Better thermal management
- Overcomes high-speed design issues and constraints, i.e. low inductance
- No via plugging is required at component locations
- Provides a flat, coplanar surface for component attachment.
However,
there are some disadvantages associated with this technology. The most
prominent and worrisome is the cost impact associated with adopting a
new technology. PCB fabricators identified two primary cost drivers
associated with specifying via-in-pad technology: additional
manufacturing process complexity and the underlying material cost for
the conductive fill.
Specifically, via-in-pad
technology adds eight to 10 steps to the board manufacturing process,
while via fill cost is a function of the via size and the actual number
of via instances on any given design. However, the reduction in layer
count realized by using via-in-pad technology compensates for the added
cost associated with this process. PCD&F
Ishtiaq Safdar and Faisal Ahmed are PCB layout engineers with NexLogic Technologies, San Jose, CA. They can be reached at This email address is being protected from spambots. You need JavaScript enabled to view it..
REFERENCES
1. Lackwerke, Peters, Technical Information: “Plugging Processes…,” Merix Application Notes.