A successful BGA design is the right combination of pad diameter, drill diameter, anti-pad and aspect ratio that maximizes the routing density.
A BGA is a surface-mount package used for ICs. Solder balls are stuck to the bottom of the package, and the BGA is placed on a PCB that maintains copper pads in a pattern that matches the solder balls. The assembly is then heated in a reflow oven, causing the solder to melt, flow around the BGA footprint and align with the PCB.
The size and location of vias determine the trace and space, and the number of tracks per channel. Therefore, the key element to success of BGA/PCB interconnects or BGA escape/routing techniques is to determine the right combination of trace width and space, pad diameter, drill diameter, anti-pad diameter and aspect ratio. This allows the PCB to be fabricated with high yields for the lowest cost, and to maximize routing density, thus reducing layer count and improving electrical characteristics.
It is important to utilize design-for-manufacturing (DFM) guidelines, as well as IPC specifications for high PCB yields, low cost and long-term reliability. The combination of DFM guidelines (PCB fabrication tolerances) and IPC specifications equals the BGA/PCB interconnect design guidelines.
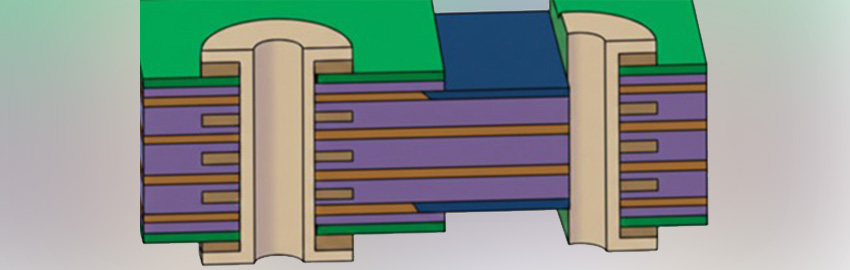
For the BGA to interconnect to the PCB on all layers, vias are required in the BGA array of the PCB. These vias are commonly called “dog bones,” as they are connected to the BGA copper footprint with a trace and look much like a dog bone on the external layer (see Figure 1). BGAs maintain a pitch for each footprint and range from 1.27 mm down to 0.4 mm with I/O ranging from 96 to 2577. The pitch of BGAs allows through-vias to be placed on the PCB, which determines the number of traces allowed to fan-out or route between pads on internal layers.
|

FIGURE 1. 1 mm BGA, IPC 6012B Class 2, thickness 0.093" to 0.100", aspect ratio 10:1.
|
In some cases, microvia technology is required for efficient routing or to maintain electrical characteristics. It is important to utilize DFM guidelines and IPC specifications when designing or routing out the BGA devices. The key element to success of BGA design or routing techniques is to find the right combination of pad diameter, drill diameter, anti-pad and aspect ratio to maximize the routing density. This combination equals BGA/PCB interconnect design guidelines that provide high PCB yields in a timely manner for the lowest cost, while maintaining superior long-term reliability.
BGA Interconnect Design Guidelines
We begin the design process by reviewing the BGA devices and determining the ball pitch, number of traces, trace width and spacing that can be achieved while maintaining sufficient pad diameter for manufacturing. To determine the number of tracks per channel, we must first determine the pad diameter and refer to IPC 2221A, which is an IPC standard for PCB design that includes PCB fabrication tolerances. Section 9.1.1 of this specification provides an equation and reference chart for land requirements, drill diameter, plus annular ring requirement and layer count. With these known values, you can determine pad diameter (see Figure 2).
|

FIGURE 2. IPC 2221A, 9.1.1 Land Requirements (May 2003).
|
This chart includes manufacturing tolerances for registration during the image, lamination and drill process. For example, using the equation shown in Figure 2, (land size, minimum = a + 2b + c), with a 0.010" drill diameter, 0.001" for annular ring, 0.0079" for level C, and 0.00197" for more than eight layers, the requirement is a 0.020" pad diameter (IPC 6012B Class 2). If the design requirement is for Class 3, additional pad diameter is required because of the annular ring requirement for Class 3 being 0.001" and Class 2 allows 90° breakout.
Additionally, designers normally deal with finished hole sizes (FHS) and not drill diameters. To determine the drill diameter, take the nominal FHS and add 0.004". Also, vias are plated-down or can be plated solid with a good FHS specification for vias that are 0.010" +00/-0.010" (assuming an aspect ratio of 10:1).
Another major factor in PCB fabrication is the aspect ratio. Aspect ratio is the thickness of the PCB divided by the drill diameter. For example, a 0.100" thick PCB with a 0.010" drill diameter equals a 10:1 aspect ratio and is the preferred aspect ratio for North American PCB fabricators and Tier 1 offshore fabricators. Aspect ratio is important due to the plating process in fabrication and the ability to get plating solutions to flow through the hole efficiently in order to copper plate. A 10:1 aspect ratio is acceptable for a 0.010" drill diameter and larger. When using a 0.008" drill diameter, fabricators prefer an 8:1 aspect or a max PCB thickness of 0.062". If thicker boards and higher aspect ratios are used, it can limit the number of fabricators that can successfully build the PCB in volume production.
The next consideration is the anti-pad or clearance for the plane (power and ground) layers. The preferred anti-pad is 0.010" drill-to-copper and 0.008" drill-to-copper for advanced PCB fabricators. Another area of concern for the anti-pad is maintaining sufficient copper to provide an adequate reference plane for impedance traces. Also, if using a thermal relief on power and ground layers, provide a 0.006" clearance per side on internal layers and an 0.008" per side on plated layers external or buried via layers. See Table 1 [PDF format] for pad diameter, drill diameter, anti-pad and aspect ratios for IPC Class 2 designs.
Now that we have determined the pad diameter, the next step is to determine the space allowed between pad and trace. An important DFM guideline is drill-to-copper or the distance from the edge of the mechanical drill to the nearest copper feature. The standard in North America and for Tier 1 off-shore fabricators is 0.008". However, 0.010" drill-to-copper is preferred for Tier 2 and 3 off-shore fabricators (Figure 3).
|

FIGURE 3. Drill-to-copper. Standard 0.010" (250 µm), minimum 0.008" (200 µm).
|
The next step is to look at the BGA pitch and determine the best practice, trace and space. Currently, for lowest cost and highest yields, fabricators prefer a 0.004" trace for routing or escaping BGAs. A 0.003" or 0.0035" trace and space are options, but they are considered advanced technology. We begin by reviewing a 1.27-mm pitch BGA for IPC Class 2. A 0.022" pad diameter can be used with a 0.010" drill and three tracks with 0.004" trace and space with a board thickness up to 0.100" (Figure 4). Four traces with 0.003" trace and space can be accomplished, but this is considered advanced technology (Figure 5). Anti-pad for the 1.27-mm device would be 0.030", leaving 0.020" of copper for the reference plane or carrying current (Figure 6).
|

FIGURE 4. 1.27 mm BGA, IPC 6012B Class 2, thickness 0.093" to 0.100", aspect ratio 10:1.
|
|

FIGURE 5. 1.27 mm BGA, IPC 6012B Class 2, thickness 0.093" to 0.100", aspect ratio 10:1.
|
|

FIGURE 6. 1.27 mm BGA, IPC 6012B Class 2, thickness 0.093" to 0.100", aspect ratio 10:1.
|
A 1-mm pitch BGA with a PCB thickness up to 0.100" with a 0.010" drill, a 0.020" pad external and a 0.01937" pad internal allows 0.004" trace and space (Figure 7). Additionally, the anti-pad is 0.028", maintaining 0.0114" copper. If the PCB thickness does not exceed 0.062", a 0.018" diameter pad with a 0.008" diameter drill can be used, which allows three traces with 0.003" trace and space. But again, this is advanced technology.
|

FIGURE 7. 1 mm BGA, IPC 6012B Class 2, thickness 0.093" to 0.100", aspect ratio 10:1.
|
BGAs with a 0.8-mm pitch get very interesting and become the point at which to consider microvia technology. External via pads are 0.019" with internal pad diameters of 0.0195" using a 0.010" drill (10:1 aspect ratio), which allows a 0.004" line and space. The problem begins with an anti-pad of 0.028", which provides 0.0035" of copper remaining, which is not a good reference plane or sufficent copper to carry current.
If the PCB maintains an overall thickness of 0.062" or below (8:1 aspect ratio), a 0.018" diameter pad can be used with a 0.008" drill, allowing 0.0045" trace and space with a anti-pad of 0.026". This configuration equals 0.0055" of copper remaining and is not preferred for impedance reference. Therefore, the solution for an 0.8-mm device is microvia technology because it eliminates through-holes (vias) and the need for anti-pads or clearances on plane layers.
Standard 0.006" laser-drilled microvias are drilled directly into the pad (via-in-pad) allowing a 0.005" trace to be routed externally and with double track or two traces with 0.004" trace and space on layer 2. Microvia technology allows smaller features and eliminates through-vias, creating additional routing density, and can reduce layer count.
Microvia technology is the solution for 0.5-mm pitch devices since traditional through-hole technology does not allow manufacturing tolerances required to fabricate PCBs with high yields and low cost. A 0.5-mm pitch requires a 0.010" pad diameter with microvia via-in-pad or offset microvia, whereas the microvia can be offset much like dog bone technology to eliminate via-in-pad issues during the assembly process.
We do not recommend routing external traces, since it requires a 0.003" trace with 0.0033" space and can lead to the need for laser direct imaging (LDI) to meet the solder mask clearance requirements. This can be provided but adds cost to the PCB. Internal traces for the 0.5-mm footprint, 0.003" trace and 0.0033" space can be achieved and increased to 0.004" trace and space after escaping the BGA to lower the PCB cost and improve yields.
Standard microvia technology allows designers to go from layer one to two or three. However, this technology is limited to a max of three layers, which limits routing. To go deeper or incorporate multiple layers within the PCB requires the use of stacked microvia technology.
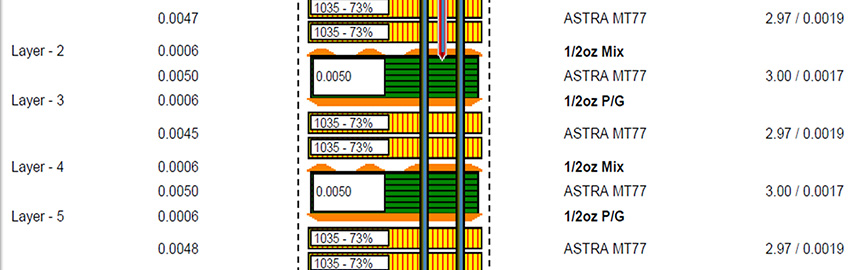
Stacked microvia technology can go down to layer five by stacking microvias and using a solid copper plate to eliminate via-in-pad issues at assembly. Additionally, stacked microvias can be utilized to route out of a 0.4-mm pitch device by routing the outside row on layer one and laser drill remaining I/Os to layer two. Now layer two is the outside row, which can be routed using a 0.004" trace. This inverted pyramid approach can be used to fan-out all rows. Laser drills can be offset within the 0.4-mm pitch device to create every other channel available for routing with a 0.0033" trace and space.
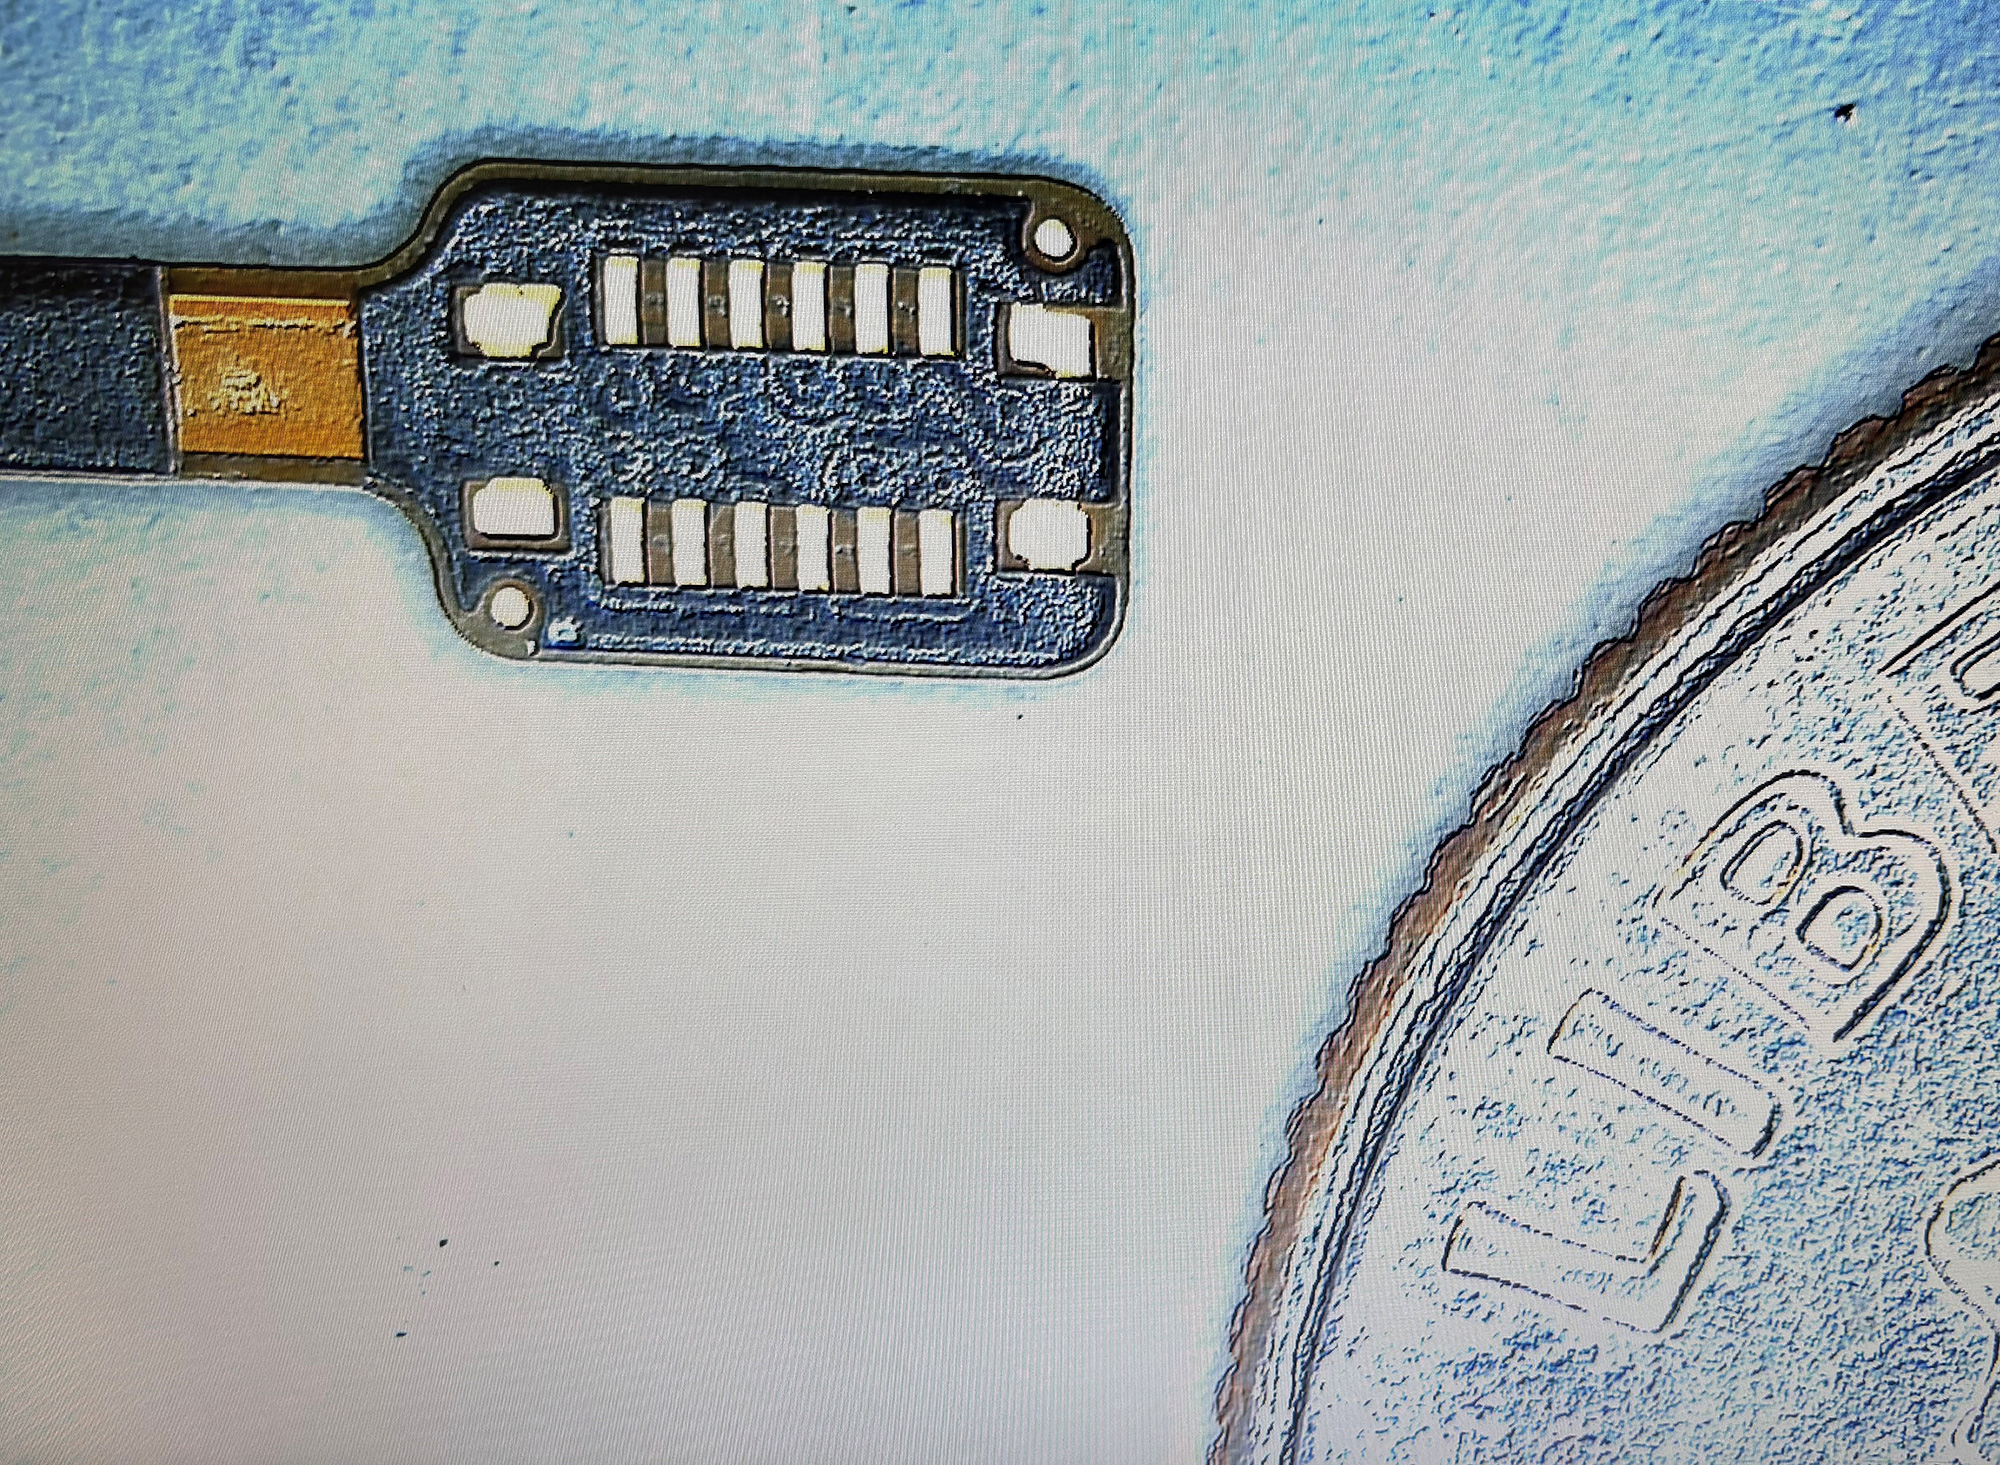
Stacked microvias can also be utilized for 0.25-mm flip-chip technology. This is routed with a 0.0068" pad diameter around a 0.004" laser-drilled hole and uses a 0.003" space, routing outside rows with a 0.003" or 0.004" trace using an inverted pyramid scheme to escape the BGA. This technology is only available at leading-edge PCB fabricators (Figure 8).
|

FIGURE 8. 0.25 mm flip chip.
|
Inches vs. Millimeters
We discussed BGA routing techniques in this article using inches. However, we can promote the same message in millimeters as it relates to drill-to-copper, pad diameter, drill diameter and aspect ratio (Table 2 [PDF format]). For example, a 1-mm pitch BGA consists of a 0.5-mm pad diameter and a 0.25-mm drill, with a 0.1 mm trace and space.
Conclusion
The key element to success with BGA/PCB interconnects or BGA escape/routing techniques is to determine the right combination of trace width and space, pad diameter, drill diameter, anti-pad diameter and aspect ratio. This allows the PCB to be fabricated with the highest yields for the lowest cost while maximizing routing density, thus reducing layer count and improving electrical characteristics.
It is also important to utilize DFM guidelines and IPC specifications for high PCB yields, low cost and long-term reliability. The combination of DFM guidelines (PCB fabrication tolerances) and IPC specifications equals the BGA/PCB interconnect design guidelines.
Additionally, the use of an 0.8-mm pitch BGA is the time to consider microvia technology, and a high I/O count 0.5-mm pitch device pushes the consideration for stacked microvia technology.
We suggest contacting your fabricator when starting the design process or after a netlist is extracted and a layer assignment is complete. Discuss your plan for drill sizes, pad sizes, anti-pads and thermal reliefs, as well as the construction and PCB material selection. The fabricator can provide a PCB construction with material recommendations, impedance calculations and confirm your choice of pad, drill, anti-pad, thermal reliefs, and trace and space. Incorporating these design guidelines will allow the PCB to maintain efficient routing, reduce the number of layers required, enhance electrical characteristics, provide a robust, reliable design and allow the PCB to be manufactured with the highest yields in a timely manner at the lowest cost. PCD&M
Gil White is a technical marketing manager at DDI. He can be reached at This email address is being protected from spambots. You need JavaScript enabled to view it..