When it comes to defining measurement, industry standards are lacking. Is a solution available?
Widely used specifications for acceptance of printed circuit boards, such as IPC-6012 and MIL-PRF-31032, call for visual examination to be “conducted at 3 diopters (approx. 1.75x).”
(The diopter value of a lens is the inverse of its focal length in meters. Hence a 3-diopter lens has a focal length of 1/3 meter, or 333mm.) J-STD-001E, for printed circuit assemblies, provides more elaborate requirements on magnification, calling out four magnification ranges dependent on as many ranges of land widths.
Further, J-STD-001E advises that illumination at workstations be a minimum of 1000 lumens/m2, with light sources selected to prevent shadows, and having a color temperature of 3000-5000K.
Such criteria for conditions and tools in visual examination are inadequate. Among their deficiencies evident to all but the most casual observers are the lack of requirements on
- An inspector’s own vision, with or without corrective lenses.
- Distance at which the inspector’s eyes are focused.
- Illumination intensity and direction at the inspection station.
- Color temperature of light source.
- Resolution of the inspection tool.
Here, we focus on resolution, which we consider the most critical optical inspection parameter. Paraphrasing a long-forgotten authority, we argue that “the purpose of an optical inspection tool is not to magnify, but to resolve detail.”
Magnification. Before looking at resolution, we will consider the matter of magnification, and show that topic itself is incompletely addressed in the aforementioned standards. In the following discussion, be aware that the simple expression (1) below, for magnification M of a thin lens as studied in an engineering physics text like Knight1, where h’ = image height, h = object height, s’ = image distance, s = object distance, is not useful in the current context.
 (1)
(1)
Here we are concerned with the perceived magnification, by a viewer’s eye.
IPC-OI-645, Standard for Visual Optical Inspection Aids, requires that magnification “be determined with the magnification aid focused so that the viewer’s eye is focused at infinity” and by using the equation (2) through the definitions in Figure 1,
β = ½ the angle subtended by the height H’ of the image as seen through the magnifying aid.
α = ½ the angle subtended by the height H of the object as seen at a distance of 254mm by the unaided eye.
 (2)
(2)

Figure 1. Angular magnification, with h the object height, h’ the image height, α the angle subtended at the observer’s eye by the object, and β the angle subtended at the observer’s eye by the image.
IPC-OI-645’s instruction implies that magnification depends on the position of the object with respect to the magnifying aid and on the distance from the eye at which it is focused. (The standard, in its discussion of magnification, implicitly takes the “aid” to be a lens, so we do the same.) IPC-OI-645 provides two expressions, equations (3) and (4) below, for magnification. In what follows, refer to Figure 2.
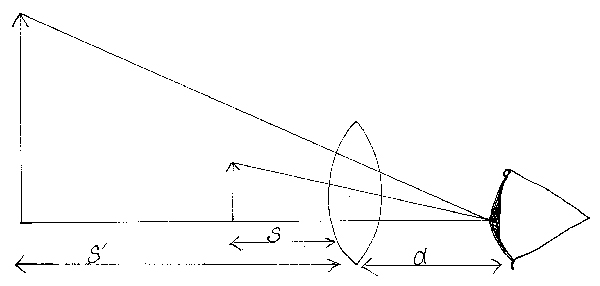
Figure 2. Distances used in equations (3) and (4): s = the distance of object from the observer’s eye distance; s’ = distance of the image from the observer’s eye; d = the distance between the observer’s eye and the surface of the optical aid.
In (3) and (4), L = standard viewing distance for the unaided eye, commonly taken to be 254mm; s = object distance; s’ = image distance; f = focal length of the magnifier, and d = the “eye relief”, axial distance from the surface of the eye to the corresponding principal point of the lens.
 (3)
(3)
 (4)
(4)
Of the two, (3) is more useful.
When the object is located at the rear focal point of the lens, the image distance is at negative ∞ and (3), using L = 254mm, becomes
 (5)
(5)
A 3-diopter lens, typical of those found in bench magnifiers, has focal length 333mm and, under conditions where (5) applies, a magnification of 0.75X.
When the observer sees an image 254mm in front of the eye, d – s’ = 254mm and (3) becomes
 (6)
(6)
When the eye relief d = 0mm and f = 333mm, (6) yields the commonly reported magnification of 1.75X for magnification of a 3-diopter bench magnifier. However, as mentioned above, eye relief is measured from the principal point of the lens, which is interior to the lens, so cannot be 0mm. It may be worth pointing out that one of the benefits apart from magnification of optical inspections aids is their ability to reduce eye strain.
We may have said more than necessary to demonstrate that magnification in an optical inspection tool depends on too many parameters to be described as casually as the printed board and assembly acceptance standards do.
Incidentally, this point may be as good as any to mention that IPC-OI-645 also has a requirement on visual acuity, calling for far better vision than 20/50 Snellen and for normal color perception.
Resolution
Astronomy is a popular hobby and of interest to people everywhere, so many are familiar with the resolution concerns of astronomers. Searches for planets orbiting stars other than the sun, locating sources of gamma-ray bursts, mapping irregularities in the cosmic background radiation – all these benefit from improvements in resolution of a variety of telescopes.
Figure 3 demonstrates the effect of improvements in resolution on the perception of a specimen, without any change in magnification. In the four images comprising Figure 3, the specimen is a region of the sky containing the Andromeda galaxy, so called because it lies in the constellation of Andromeda. Each of the images exhibits the same angular magnification of the galaxy. The resolution of the images increases from (a) to (d), revealing more of the internal structure of the galaxy, such as the dark gas clouds around its rim.

Figure 3. These images of the Andromeda Galaxy have the same angular magnification but increasing the resolution sharpens the detail.
Three sections dealing with resolution in visual inspection follow. They address resolution grades as described in IPC OI-645, resolution considerations in optical instruments, and resolution considerations in electronic microscopes.
IPC-OI-645 has 12 inspection grades, characterizing them by resolution and magnification.
Examples are:
Grade I: use of the unaided eye with the ability to resolve 6.35 lines per mm.
Grade II: magnification of 0.75 and the ability to resolve 4.49 lines per mm.
Grade III: magnification of 1.0 and the ability to resolve 6.35 line per mm.
Grade IV: magnification of 2.0 and the ability to resolve 12.7 lines per mm.
leading ultimately to
Grade XI: magnification of 200.0 and the ability to resolve 362 lines per mm.
The standard calls for resolution target patterns, each consisting of three black lines on a transparent background, with each line five times as long as it is wide. The phrase “lines per millimeter” in the various Grades implies that the black line occupies half of the width of the line, with the transparent background comprising the remainder. Hence, a Grade I device resolves black lines of approximate width 0.8µm. A Grade IV device evidently will resolve black lines approximately 0.4µm in width.
A common target pattern is the USAF 1951 resolution test pattern, shown in Figure 4. Relating resolution to targets based on grey scales or colored specimens is important in real applications of optical instruments, but beyond the scope of discussion here.
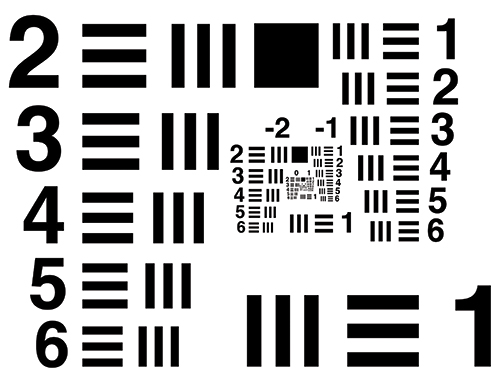
Figure 4. USAF 1951 Resolution Test Pattern.
Optical Instrument Resolution
In considering the resolution of microscopes using electronic detectors and displays, we must first look into the resolution of the optical microscope that is used to illuminate the detector. So our readers will have a sense of the factors affecting resolution, we provide below a justification of one of the expressions for resolution found in guides to microscope use, showing that it is connected to the diffraction limit imposed by the properties of the objective lens.
A common expression, called the Rayleigh criterion2, relates microscope resolution R to wavelength of light λ used for illumination and the numerical aperture NA of the objective lens:
 (7)
(7)
Numerical aperture for a microscope is defined3 as
 (8)
(8)
Where n is the index of refraction of the medium surrounding the objective lens and θ is half the maximum angle of entry by light into the lens as measured from its focal point P, as shown in Figure 5.

Figure 5. The numerical aperture with respect to a point P depends on the half-angle θ of the maximum cone of light that can enter or exit the lens.
Denoting the lens focal length by f and its diameter by a,

Using n = 1.0 for the index of refraction of air,

Substituting (8) into (7) yields
 (9)
(9)
Equation (9) is the same expression the classical optics texts, such as that by Rossi4, give for the diffraction-limited resolution of light passing through a circular aperture. Hence, microscopes with non-monochromatic light sources and with non-perfect optical properties, such as lenses made from glasses in which index of refraction is a function of wavelength, will have a value of R greater than that predicted by equation (7).
The human eye is most sensitive to light of wavelength around 550nm. Taking that wavelength as comprising the light used for observation, a 20X fluorite microscope objective with a numerical aperture of 0.46 is predicted by equation (7) to have a resolution of 730nm. This resolution would be adequate for inspection of microsections of printed circuit boards to the requirements of the IPC and military specification.
By comparison, a typical desktop magnifier, such as might be used for visual inspection called for in IPC-6012, characterized by a refractive power of 3-diopters, implying a focal length of one-third meter, might have viewing diameter of 200mm. If the specimen being inspected is located a distance from the magnifier equal to its focal length, and 550nm light is again used for observation, equation (9) reveals this optical aid’s diffraction-limited resolution to be about 1.1µm. Going back to the magnification of 1.75 from equation (6), a 1.1µm feature would appear to the observer’s eye in size as approximately 2µm. An excellent human eye has a resolution of approximately 105µm when viewing at a distance of 30cm, based on the statement that one with excellent visual acuity can resolve 50 cycles per degree.5 (The 105 micrometer value results from the approximation that an object 30cm in length subtends an angle of 1 radian at a distance of 30cm.) Hence, the magnifier does not limit the perceptions of a person performing visual inspection in accordance with standard specifications.
Another optical inspection device, the SimmScope, which one of the authors (Simmons) designed for visual inspection of populated and unpopulated printed circuit boards, incorporates a microscope having an objective lens with numerical aperture = 0.135. Going back to equation (7), we can calculate the resolution of the SimmScope to be approximately 2.6µm with light of 550nm wavelength. This resolution seems more than adequate for the device’s intended function: visual inspection of unpopulated printed wiring boards and of electronic assemblies.
We will mention that, in reality, lenses have image-degrading characteristics in addition to their diffraction-limited resolution, which Meyer-Arendt describes.3 Spherical aberration results from the inability of a lens with surfaces that are segments of a sphere to bring light rays impinging upon different regions of its object-side surface, even if they are parallel to the optical axis, to a common focal point. Chromatic aberration is a product of variation in the index of refraction of glass with wavelength, and its effect on resolution is evident from equations (7) and (8).
Electronic Microscope Resolution
Two factors contribute to performance of the electronic segment of a microscope: the overall size of the charge coupled device (CCD) detector and the dimensions of its individual pixels.
The CCD’s overall size determines the field of view available to the video monitor.
The dimensions of the pixels in the detector limit the resolution of the electronic portion of a microscope. Ideally, pixel size is less than that of the minimum feature the optical microscope can resolve.
One version of the SimmScope uses a 5Mp detector; i. e., a 2592 x 1944 pixel array. Its nominal size is ¼". Since CCD sizes are given as “measured diagonally,” one might infer that the diagonal length of a 5Mp rectangular device is ¼". In reality, it is somewhat less, approximately 4.5mm. Hence, the lengths of the two sides of the rectangle are 3.6 and 2.7mm. We can estimate the size of a single pixel by taking the 2592 pixels as being distributed equally along the 3.6mm length. In this way, the single pixel size is estimated to be approximately 1.4µm. A similar calculation using the 1944 pixels along the 2.7mm side gives the same size for one pixel. Since the microscope’s optical system has a resolution of about 2.6µm as calculated above, the detector is not the limiting factor in the overall performance of the instrument.
Widely used standards are inadequate when it comes to specifying visual inspection in terms of magnification, as the manner in which an optical aid is used impacts its magnification. Resolution is a critical parameter that we recommend specifying along with magnification in requirements for visual inspection. IPC OI-645 may be helpful by its categorization of optical aids to inspection into 12 grades.
References
1. Randall D. Knight, Physics for Scientists and Engineers: A Strategic Approach with Modern Physics and Mastering Physics, 2d edition, Addison-Wesley, 2007.
2. Lord Rayleigh, F.R.S., “Investigations in Optics, with Special Reference to the Spectroscope,” Philosophical Magazine, vol. 8, no. 49, 1879.
3. Jürgen Meyer-Arendt, Introduction to Classical and Modern Optics, Prentice-Hall, 1984.
4. Bruno Rossi, Optics, Addison-Wesley, 1965.
5. John C. Russ, The Image Processing Handbook, fifth ed., CRC Press, 2007.
Louis Hart is engineering quality manager at Compunetics (compunetics.com); This email address is being protected from spambots. You need JavaScript enabled to view it.. Robert Simmons is president of R. S. Simmons (rssimmons.com); This email address is being protected from spambots. You need JavaScript enabled to view it..



 (1)
(1) (2)
(2)

 (3)
(3) (4)
(4) (5)
(5) (6)
(6)

 (7)
(7) (8)
(8)


 (9)
(9)


