Good PCB design doesn’t have to be time-consuming.
After 25-plus years of PCB design, I could not imagine going back to designing a PCB as I did in the late ’90s or even early 2000s. New technology is constantly added to tools to simplify our job. The key is staying abreast of these technologies. If you are not using advanced techniques like high-speed routing and tuning, placement planning groups, design reuse, plane generation automation and others, your design completion time could be delayed up to 70% or more.
Most designers start a PCB design by grouping parts using cross-probing from the schematic. However, using a spreadsheet-based view (FIGURE 1) allows us to quickly see information about components and groups created for each circuit. These groups can be created either in the schematic or PCB layout.

Figure 1. Spreadsheets show component and group data for each circuit at a glance.
Today, every design contains some sort of I/O interconnect, visual indicators and mounting features that need to interact with a mechanical enclosure. In most cases, the mechanical engineer will define the locations of these objects and even place 3-D models to support their design efforts.
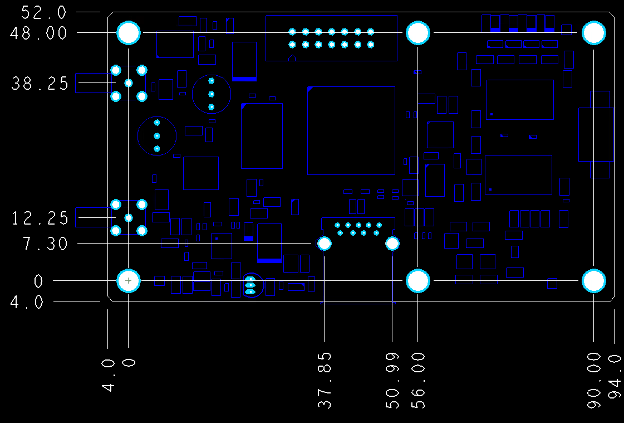
This design example is started by using collaboration data created from Siemens NX. Our ME created the board outline, mounting holes, and connectors based on their mechanical design. In less than a minute we’ve done the work that would normally take 60 min. or more (FIGURE 2). In addition, using drawings means a higher chance of making an error.

Figure 2. ECAD/MCAD collaboration tools allow the ME and EE to exchange data using visualization and electronic data.
Creating a rough placement while seeing interconnect using groups allows us to plan our placement without placing a single part (FIGURE 3). While placing groups, net lines are visible, which vary in thickness based on the connection count. The circle size for a group is defined by the component size and count. More important, we can see net topology between groups, which helps determine routing paths and potential for congestion. In addition, we can create hierarchical groups, one large group for the entire circuit and subgroups for items such as termination resistor, decoupling, etc. This allows use of additional automation for parts to be placed on the bottom or at a particular rotation, which can be assigned to each group or subgroup.

Figure 3. Placement groups allow preplacement planning.
Most schematics and PCB tools can cross-probe to assist with placement. To simplify this task, however, we can use an embedded schematic viewer with simplified controls (FIGURE 4). Passive components always pose a challenge to place, given the large number in a design. Finding passives via the schematic and using sequential placement simplifies this. While placing termination resistors for this connector, we’ll use alignment technology to speed placement. As each part is placed and lines up with the axis of another, the part snaps to the edges of that placed component.

Figure 4. An embedded schematic viewer.
At some point, a group of parts will need to be moved. Creating groups for the majority of parts in a design enables moving a selection of components easily.
Design Reuse
The ultimate time-saving technique is to reuse circuits from one design in another. Design reuse can be done for the schematic and PCB. Our sample design contains two USB interfaces that use the same circuit but different connectors. The connectors were placed via MCAD collaboration; for the remaining components and routing, we will reuse designs.
Layout reuse includes all items that can be created in a layout, along with those selected upon creation (FIGURE 5). These can include part placement, traces, planes, vias, drawings, keep-outs, stack-up, manufacturing data, and so on. If reference designator values from the saved reuse and the current design are the same, some tools offer the option to automatically choose the correct parts. If there’s no reference designator match, you can auto-resolve part selection and interactively select the appropriate part for those that do not have a single match. Once placed, the circuit can be customized based on surrounding circuits.

Figure 5. Reusing circuits across multiple designers saves time for many functions.
Constraint Management
Many designers try to avoid the constraint management process, except for the basics, as they find it time-consuming and difficult. Constraints are the backbone of good PCB design, however. Without constraints it’s difficult to produce a design that’s correct 100% of the time, especially when the design is anything but simple.
Constraint editors define rules that most users feel are overly complex in a simple and structured fashion. Let’s start with net classes. Why is the process of creating net classes worthwhile? Classes allow us to organize groups of nets that require the same physical rules. Rules defined on a net-by-net basis will become very unorganized and difficult to manage. Classes provide additional benefits like assisting with viewing, setting colors, design review, using routing automation, etc. The sample design shown in FIGURE 6 defines 10 net classes. The 100, 90, and 50Ω classes simplify routing by defining trace width impedance rules based on layer. With access to a stack-up editor, designers can also determine single-ended and differential pair trace widths and gaps for impedance-controlled nets (FIGURE 7). Find the proper trace width, and the software will calculate the gap. Trace width and gap will automatically adjust depending on the layer its routed on, and you can control which layers will be used for routing. These classes could have been made more granular by doing it based on specific net groups; this decision will be made based on design requirements.

Figure 6. Net classes define trace width impedance rules based on the layer.

Figure 7. A stack-up editor determines single-ended and differential pair trace widths and gaps.
We have not yet defined physical spacing rules between objects. Our net class definition only created a container for a group of nets, the routing layers, trace widths by layer, and differential pair trace width/gap. Every design contains certain technology or requirements that use specific clearance rules, but not every net group needs these special rules. With most tools, you define physical spacing rules with a net class. This makes the process simple, but it does not allow different spacing rules between classes to be defined easily.
Typically, defining class-to-class spacing rules requires more complex and time-consuming processes. If the CAD tools allow you to define specific rules based on technology or requirements, apply rule reuse. Once the general and special clearances have been defined, a simple class-to-class matrix can define where the spacing rules will be used. The benefit here is if a clearance requirement changes, you don’t have to remember where those rules were set. Just change the clearance group in question, and it’s automatically applied where needed.
What happens when you work on that design with a new processor, DSP, or FPGA where the package is only available in 0.8mm or smaller pitch package? Or what if you’re introducing RF circuitry like 5G or designing products with high voltage? With most design tools, you need to be cognizant of where traces traverse boundaries, requiring different trace width and spacing.
To simplify the design process, we could use rules that are specific to an area of the board. When this capability is needed, it by far outweighs almost anything else that would reduce routing time.
Now that we’ve created the core rules required to design a PCB, what if we have nets sensitive to signal quality, like SerDes differential pairs, DDR, common interfaces like USB, Phy, HDMI, etc.? These all require special electrical rules: length matching, special vias, topology control, trace length control by layer, maximum via count, and differential pair creation. In some rare instances, the need to create rules that rely on length information from other nets or pin pairs may be required to simplify routing.
CAD tools handle this through formulas. These types of rules are classified in some CAD tools as constraint classes. Why a “class?” Because each grouping created will include net assignments, similar to net classes. One might ask, “I’ve already created net classes. Why do I need to do it again for length rules?” Reason: Net classes define spacing and trace width requirements for nets to be combined, even though they may not have the same electrical rule requirements. For clarification, let’s say differential pairs need to be 100Ω, and layer restrictions are not a concern. These nets could include SerDes, DDR Clock and Strobe, HDMI, etc. When it comes to electrical rules, all these would require their own classes, but we can simplify trace-and-space rules by putting them in the same net class.
Differential pairs merit more detail, as these are probably the most common special rule feature used in a design. Whether you’re in the schematic tool or layout, ideally you can access the same constraint classes with all the same rules, including creating pin pair definitions and differential pairs. Automation will help create the diff pair associations, so each net pair is done one at a time. Assuming the schematic is correct and diff pair nets are named with a proper suffix (i.e., _P and _N, or something to that effect), it takes seconds to find and group all nets in the design with these suffix values.
Another rule reuse option on the electrical rule side is constraint templates. These allow us to take a constraint definition for a net or diff pair with any of the following rules defined: net class association, topology definition, including virtual pins, stub length, max. vias, length, test point count, restricted layer length, formulas, and special differential pair rules. These can be saved to a constraint template that can be assigned to objects requiring the same electrical rules (FIGURE 8). When we adjust one or several of the parameters, all nets or diff pairs assigned that template name will take on those changes. So, instead of managing the process of modifying all these individually, it can be done in one location. Finally, constraint templates allow the sharing of design rules from one design to another via export and import.

Figure 8. Constraint templates.
Routing Automation and Length Matching
The simplest form of routing automation is fanning out pins from SMDs. This is the process of using the autorouter to connect short traces to a via, so a net has access to internal layers. To take full advantage of automated fan-out design, rules are required: items such as fan-out direction from SMDs/pins, trace width to be used by net or class (e.g., “power and grounds nets usually require large traces”), via type to be used by net or net class, allowed length of trace, and clearances.
Let’s start with BGAs. These devices are, for the most part, the simplest. Choose one of three options and go (FIGURE 9). For non-BGA parts, you have more choices. Take, for example, a high-pin-count connector. Ideally, the power and ground pins are routed to the outside, and all the diff pair pins are routed on the inside to minimize length discrepancies (FIGURE 10). To achieve this, set the fan-out direction for outside, select the power/ground (PG) pins and perform the fan-out. Next, adjust the fan-out direction to inside, select the component, and fan-out the remainder. For tight designs or BGAs with fine-pitch ball spacing, placing vias in the pins of passives or even BGA pads is required. Adjustable on-the-fly settings and finite control make the process that much easier. In our case, we need to place decoupling caps directly under the BGAs, which requires vias to be placed in the pins. After defining a via-in-pad rule in the CAD tool, we can place capacitors at the appropriate locations with no issues.

Figure 9. BGA fanout options.

Figure 10. Sample connector for fanout.
Now that we’ve created the appropriate rules and placed our fan-outs, it’s time to start routing. This phase of the design usually takes the most time, especially when hand-routing, which involves point-and-clicking each point, with no push-and-shove. It’s surprising how many designers today still prefer this method, even when the tool contains interactive routing technology. We recommend investigating the push-and-shove routing capability of the CAD tool. Two automated options are available: interactive push-and-shove for single or multiple nets and sketch routing. Automated methods can cut design routing time by five to 10 times.
Finishing the Design
Aside from documentation, typically one of the last major tasks to complete a board design is creating plane areas. Many of today’s designs include 10, 20, even 30-plus plane areas, or very complex board outlines, all of which can consume a good portion of the design time. One type of circuit design that requires special attention is power supplies. For power supplies, we need to keep inductance down and create copper areas that can handle high current. Doing this with traces is not the best option. Using planes and solid connections to pins is the simplest method. Drawing simple rectangles and circles, and using merge-and-cut commands, full shape corner manipulation, and setting per shape plane thermals, allows us to create complex plane areas in seconds to minutes, not minutes to hours.
In addition, when dealing with through-hole pins in power sections, it’s far less time-consuming to modify pin thermal settings based on layer and use rather than at the library level, for unlimited flexibility.
I mentioned complex board outlines. We can now create full board area planes in seconds by taking advantage of this shape and not replicating it. Having one central location to control the nets assigned to a layer, which net is allowed to use the route border as its plane shape, and setting the state of the shape facilitates proper design management.
Whether working with a four or 40-layer board, at some point we need to create embedded planes. As showed earlier, using simple rectangles and circles instead of drawing complex polygons dramatically reduces the time it takes to create embedded planes (FIGURE 11). Consider these two examples. First, we’ll create an embedded plane using rectangles and merging of shapes. What’s the advantage of taking the time to merge shapes? It allows us to easily move the shape at any point and change properties. Next, we’ll create the same shape using rectangles and merging/subtracting shapes. Having this option gives flexibility, as each design possesses different challenges. To finish our plane area, we’ll round all the corners.

Figure 11. Simplified plane shape creation.
All experienced designers must at some point fill a plane area with vias or place guard vias around a trace. Placing these one by one takes forever. In our sample design, we must create a ground plane directly under the RJ-45 connector and fill with vias. Using stitch shape, we can play with several scenarios and choose the most appropriate, as it only takes a few seconds to process. We’ll save this configuration in case we create more plane areas requiring via fill. When later creating a shape, we can then assign this configuration (FIGURE 12).

Figure 12. Via stitching setup.
Now that we have saved a configuration, if we undo the via stitching, we can assign the new via stitching configuration. To perform the stitching process requires just two mouse clicks and a few seconds to complete the job.
Automation can speed the design process in other areas. Take teardrops. They are not always needed, but when they are, they should not be cumbersome. Controlling the length and width is mandatory; otherwise, some designs may require adjusting far too many traces to add teardrops without creating DRC errors. The CAD tool should allow you to window-select traces requiring teardrops and choose that option with a single click. If the entire design needs teardrops, simply set an option for all pads (FIGURE 13).

Figure 13. Teardrop configuration.
As a specialized function we can fine-tune teardrops by setting curved settings for areas where space is at a premium. Notice how the added copper is not uniform between each side but fills in as needed to make a conformal curve.
For quick adjustments to an electrical constraint – for instance, if we forgot to define a differential pair – use of an add-in window in both the schematic and layout tools can quickly adjust electrical constraints and define a differential pair.
Likewise, say our engineering lead asked for a change to the 100Ω differential pairs and space requirements. We could rip up the traces and reroute. What’s faster, however, is to change the trace width and let the tool do the rest.
Good PCB design can be complicated and painstaking. But it doesn’t always have to be time-consuming too.
Brent Klingforth is technical marketing engineer at Mentor, a Siemens Business (mentor.com). Before joining Mentor, he spent 25 years designing PCBs; This email address is being protected from spambots. You need JavaScript enabled to view it..


