It’s as simple as doing it right the first time.
Today, design for manufacture (DfM), design for assembly (DfA) and design for test (DfT) are hot topics. Proper planning and preparation of the circuit design before the products enter into the production cycle shortens the time to market, reduces re-spins, reduces costs and improves yield. The best way to accomplish these productions successes is by thinking correctly during the design planning and preparation process. In other words, during the design process you need to do it right, so that the fabrication, assembly and test processes that follow will be successful.
The winners in today’s world of technology are the companies that are able to bring their clients innovative and valuable products or services ahead of the competition. A company that achieves a fast time to market has a number of advantages: The product’s life cycle is extended, the development costs are reduced and there is the possibility of responding faster to customers’ demands. These advantages can result in more flexible product pricing.
Designing a printed circuit board requires proper planning. Adherence to the 10 key points outlined in this article will enable a shortening of the planning and production phase of the electronic circuit, thereby reaping better results for the organization, as shown in FIGURE 1.

1. Card Size
The raw materials for manufacturing a printed circuit board arrives in the form of fixed-size laminate panels. The PCB manufacturer cuts the boards according to the measurements of the card intended for production. The better the manufacturer is able to utilize the raw material, the lower the cost of the card will be. FIGURE 2 illustrates how a change of 0.2 inches to the length of the card reduces the cost by 50% due to improved panel utilization. One is advised to consult with the PCB manufacturer in order to verify the specific raw material panel sizes that are used and how it is possible to exploit these measurements to the maximum.

2. Planning Rectangular Shapes
Many production machines used for the PCB fabrication process have conveyors that transport the printed circuit board through the process. The board must be lying on the conveyors in a stable manner in order to preserve minimal rigidity. This is particularly important for flexible circuits or thin innerlayers. To give the card mechanical strength, copper boarders are maintained around the outside edge of the panels. In addition, the individual circuit card margins need to have a component-free area of 3 mm for later routing and fixturing. The circuit card itself is typically rectangular and symmetrical.
Circuits whose shapes are not symmetrical strongly hinder the assembly process. In such cases, the card’s stability on the production line is low, and therefore, the reliability and accuracy of the placement of components or smearing of tin are low. With these circuits, it is incumbent upon the designer to perform an artificial supplementation to the measure of a rectangular card to improve stability, as shown in FIGURE 3. This supplementation will be removed during the course of production before shipment to the customer.

3. Panelization Planning
Panelization planning can reduce the cost of circuit board production significantly. The panel consists of several cards. By this method, the panel is assembled, and afterwards, the cards are removed and work continues. The length of time that the machines work on a single card while it is in the panel are substantially less than it would be if it was working on an isolated card, even if we take into account the duration of the dismantling after assembly in order to return it to its generic state.
When planning a panel, the level of precision in it’s production needs to be examined. In long panels, the precision level (tolerance) of the isolated card is multiplied by all the cards along the length of the panel, creating the potential for more movement of attachment pads along the length of the panel. In a panel with a length or width of more than 12 inches, the cumulative movement can reach 0.03 inch. This is too large of a movement if we want to install a component with 0.02 inch pitch at a high yield. On one hand, proper panel planning needs to preserve the panel’s strength and stability during a procedure that will convey it on the production lines. On the other hand, it needs to ensure that the separation of the cards will be executed as fast and conveniently as possible. There are two principal systems for this: V-CUT and break-away tabs.
For V-CUT (also known as V-GROOVE), slots are planned on the panel surface in places intended for separation. Dismantling the cards from the panel is carried out by a device with two circular cutting blades standing on top of one another creating two V-shapes. A number of parameters must be kept in mind when planning these slots: thickness of the circuit, depth of the slot from both sides of the circuit, thickness of the remaining circuit, slot width and slot angle.
In the break-away tabs system, a number of small holes (break-away tabs) are located between two areas intended for separation, and the circuits are dismantled by hand or machine breaking. In this method, a number of parameters needs to be kept in mind: the hole diameter and length, the distance between the holes, the number of holes and the distance of the holes from the edge of the circuit. In order to save production costs in this respect, one can plan the hole diameter according to the diameter of the smaller through (VIA) hole so that a drill change is not necessary to drill in the break-away tabs. It is recommended that one reads STANDARD IPC-2221, detailing how to plan the parameters of the two systems.
The V-CUT system is preferable to the Break-Away-Tabs method for several reasons: separation speed, high reliability, minimal manual engagement and low cost. With V-CUT one should pay attention to several factors including; a clearance of 1.5 mm must be maintained from the cutting slot. Likewise, components located close to the cutting slot must be strong enough to resist the mechanical pressure exerted on the area during the cutting process. When the width of the card is greater than 10 cm, one cannot plan a panel with two columns due to the lack of stability at the panel’s center. It is therefore preferred to plan a panel with a single column in order to prevent bending at the center of the panel during its transfer to solder reflow as shown in FIGURE 4.

4. Placement of Critical Components
The placement of critical components (e.g. BGA or fine-pitch) is a highly important aspect in the planning stage that has significant effects on the quality of the card after manufacture
BGA Thermal Balance. During soldering, the BGA component stores heat. Therefore, it is important to ensure that thermodynamic balance exists on the surface of the board. Asymmetrical spreading of heat can cause distortions in the card, harm to sensitive components and soldering results that are not of a high standard. Placement of BGA components on the edge of the card is not recommended, since these regions tend to be colder during the course of the soldering. Similarly, in the areas close to through-hole components, the mechanical strength of the card is lower; hence, placement in the area of BGA components is not recommended, as illustrated in FIGURE 5.

BGA Rework. To enable an optimal dismantling during rework, it is worthwhile to leave a clean area of 3 mm without additional components around the BGA component. In rework machines that work based on IR, keeping a distance of 1 mm is sufficient.
X-Ray Tests. In double sided reflow cycles it is worthwhile keeping the side parallel to the BGA component free of components to enable a reliable X-ray test to be performed. Components located on the other side of the circuit, parallel to the location of the BGA, are visible during the X-Ray procedure and can distort the results of the component soldering test.
Fine Pitch Components. Handling fine pitch components in the assembly line requires meticulous precision. Therefore, it is unadvisable to place theses components near the circuit edges, since excess solder paste may be present.
Mictor Connectors. These components are assembled on the SMT lines before putting the card through reflow soldering. In order to facilitate optimal accessibility for placing this component, it should be placed near the circuit edge, approximately 15 mm to the nearest pad. Mictor components longer than 50 mm should be placed along the circuit, in the direction of the card’s motion and inside the reflow soldering. Due to the potential bending of the circuit during the soldering, contact between the component’s center and the PCB might be affected.
5. Space Between the Components
When placing components in the printed circuit, keep a minimal distance between the packages. It is recommended that one read standard IPC-2221, which defines the required distances. If components are pressed too close together, this could result in a low production yield, making it difficult to perform circuit rework and repair, as well as hindering the manual and/or automatic visual quality control in AOI machines.
6. Designing According to the Production Process
It is important to adjust the circuit board design as much as possible to its production and assembly processes. Proper planning of the card in this framework should enable quick and problem-free production that reduces production costs and increases yields. It is advisable to place irregular components such as through-hole, ICs, fine-pitch, oscillators, as well as high, heavy and sensitive components on the component side. On the print side it is advisable to place passive components such as resistors and capacitors, which are more resistant in these production conditions. In addition, when using TSOP or SOIC components, they should be placed such in a way that applying the solder paste printing can be accomplished lengthwise in the area of the component in order to prevent short circuits near the components’ pins.
7. Designing in X-Ray and AOI Testability
The aim is to design the card so that testing will be efficient and fast. This is determined by the electrical and physical design. The physical design adjusts the card to the testing device and locates the testing points. The AOI machine performs visual testing of the card by photographing the circuitry and comparing it to a known, good design. For AOI testing to be efficient and effective, one needs to be meticulous about marking the card consistently, (e.g. fonts identical in thickness and shape, card color, consistent indications, as well as clearly marking the components’ polarity.) Inconsistent marking extends the testing time and unnecessarily increases the database in the AOI machine. Also, for the machine to achieve optimal photography, it is recommended that an open space of 35° to 65° spreading/distribution angle is maintained from each component. This allows the AOI cameras to swiftly and easily identify the component, as illustrated in FIGURE 6.

The x-ray machine performs card inspection and is intended mostly for BGA component photography. This testing is sometimes performed automatically, usually in cards with multiple BGAs, after defining the component’s location and formation. For optimal testing, the reference points (fiducial) need to be clear and easily located by the machine. Since x-rays penetrate through the entire card, the area should be clean on both sides. When locating BGA components on both sides of the card, do not place them under one other. This will make it difficult to inspect the soldering quality with the x-ray machine, as shown in FIGURE 7.

8. PCB Marking
Properly marking the electronic circuit contributes to quick and efficient production of the circuit card. This is beneficial both for automatic machines, like AOI, and for manual work performed on the card, like quality control, electric testing, rework and repair. It is necessary to ensure that the components are organized on the face of the circuit in a logical and consistent order and according to their allow the engineer to proactively improve the design, saving time and money. This step will make it easy to locate them during production. Markings should be full and complete and not hidden by pads and mechanical holes. Make sure that markings remain visible after applying the component to the card. In addition, for components with multiple pins, we have to mark pin number “1” near the relevant pad. It is also advisable to add near every tenth pin its number, this enables fast location of the component’s pins. Components having polarity should be marked with “+” to indicate the direction of applying the component, as well as the direction of electric current in diodes’ components.
9. Planning Fiducial Points
The fiducial points on a PCB are meant to aid the automatic machines in the production line. Correct positioning of the points is cardinal for the success of card production, since the machines perform their accurate tasks based on these points; e.g. applying components, applying tin and visual inspection (AOI). Therefore, it is important to be meticulous when planning the card’s reference points. First, enable solder mask clearance, to prevent the points from being hidden and possibly reducing the application accuracy. Place at least three reference points on the card face in an asymmetrical form that can enable automatic machine recognition. This can confirm that the circuit was inserted into the machine in the correct direction. Avoid placing reference points in the margins, place them a minimum 0.25 inch from edges of the card. Be sure to place the fiducial on individual cards and not only on the panel. When using an automatic solder paste printer, place reference points on the solder mask and solder paste files.
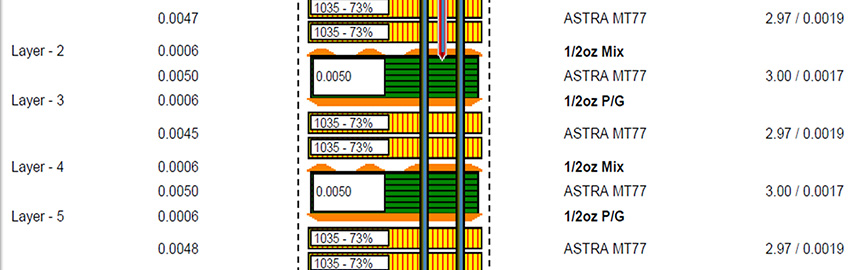
10. Board Thickness
Another parameter worth considering, because of its implications on the card’s production, is thickness. The most appropriate card thickness for production is 1.6 mm, and it is advisable to plan according to this size. When card thickness is 1 mm or less, special handling is required. The thinner the card, the less rigid it is, causing its stability during production to fall. Mechanical support needs to be taken into consideration during the planning of cards. When there are components on only one side, a support plate can be added underneath the card to keep it stable. When components are on both sides of the card, a special device should be designed to support the card during its motion on the production lines. This device significantly increases production cost (in mass production, the additional cost will be less significant) and extends delivery time; therefore, it is better to place components on one side only.
In conclusion, the linkage between planning and production of the printed circuit board is fundamental. Proper planning shortens time to market, reduces production cost and helps in achieving maximum production yield. When planning a circuit card, engineers must take into account the card’s production and assembly aspects in order to guarantee that fabrication is done right–the first time. PCD&F
Arbel Nissan is COO of CircuTec; This email address is being protected from spambots. You need JavaScript enabled to view it..