Cracking increased twofold when air cooling was used instead of water laminate cooling.
This research was initiated from a PCB qualification process for a missile guidance system. This qualification process utilized the thermal shock requirements of MIL-PRF-31032/1C, where a failure is defined as the presence of any crack in a plated via induced by the thermal shock test. A preliminary survey of PCBs that failed thermal shock qualification showed an incidence rate of approximately 15% across multiple suppliers. An incident was defined as at least one fine barrel crack in any copper-plated via. These results led the investigators to question that if cracks were present, under what manufacturing conditions could the cracks be mitigated or eliminated.
A team of designers, PCB manufacturing and plating experts, PCB testing agents, and a design of experiments (DoE) expert was formed to review PCB manufacturing methods and to develop a DoE that would identify what processes may have a causal relationship with the initiation of barrel cracks. The four factors and levels chosen are shown in TABLE 1. After identification of significant factors and preferred levels, a second optimization experiment, examining second order or higher interactions, is planned.
Table 1. DOE Factors and Levels

The laminate cooling rate is defined by the method used to cool laminated books to room temperature. The standard process is the water-jacketed cooling process. The current density is the current as specified in the rectification control panel. The pulse waveform ranges from a “more pulse” (level -1) to a “more DC” (level +1) waveform. Hot air solder leveling (HASL) is the number of times a board is subjected to HASL reflow. The screening experiment and runs are shown in TABLE 2.
Table 2. DoE Experiment Runs

A detailed manufacturing plan was developed that included key characteristics such as lamination, plating, and drilling. Lamination was performed simultaneously: six books in press at one time; three books with controlled water cooling and three books with slow cooling (air) in the room. Cooling rates were monitored by thermocouple. To minimize experimental variation resulting from other PCB manufacturing processes, all boards were plated in the same tank, as well as in the same cell using the same flight bar. Drilling was performed on the same machines, noting which spindles were used.
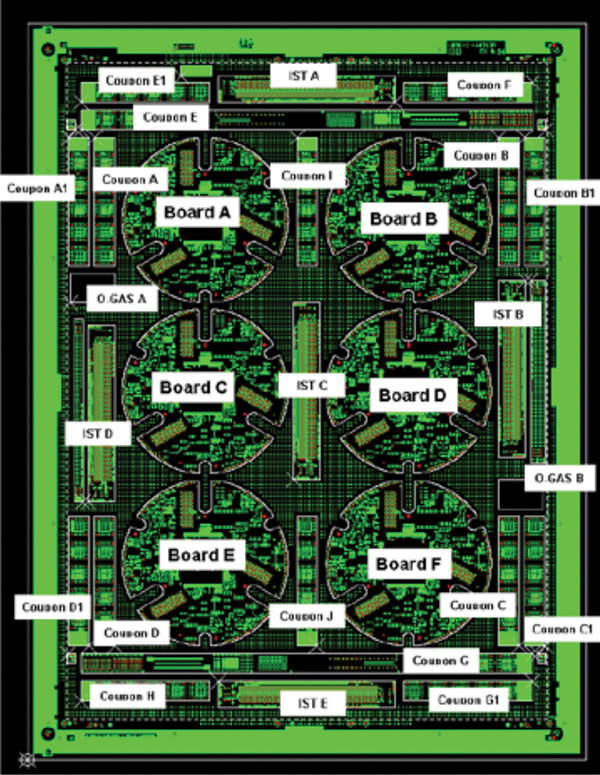
Two panels with six PCBs and various coupons were used for each run of the experiment. Since panels were processed simultaneously to minimize experimental variation, the second panel represented a repeat run rather than a true DoE replicate. However, data resulting from the second panels were included in the analysis to provide further validation. The total number of samples per run was 36. A sample is defined as one discrete barrel. A Type I error rate (α), the risk of falsely assuming a factor, which has no impact, as significant, was assumed to be 5%. The Type II error rate (ß), the risk of failing to detect a factor that, in reality, is significant, was assumed to be 5%. Based on these risks, using 36 samples enabled the detection of an improvement to 7.5% (or lower) or degradation to 21.7% (or higher) in terms of the crack incidence rate. To ensure sufficient sample size, three coupons with four barrels each were cut from two boards per run. The panel layout is shown in FIGURE 1.

Figure 1. Panel layout.
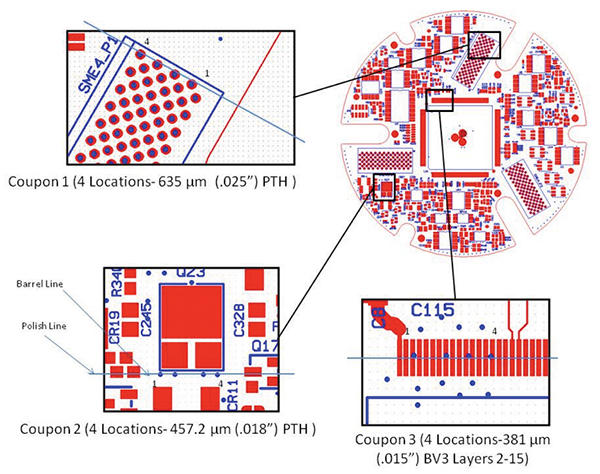
The three coupons have different types of barrel features. The first coupon, PTH1, has four 635µm (0.025") plated-through holes (PTH) for connectors. The second coupon, PTH2, has four solder mask tented 457.2µm (0.018") plated-through holes. The last coupon, BV3, has four buried vias (BV) 381µm (0.015") that were configured between layers 2 and 15. The barrel numbers for each coupon are shown in the cut plan (FIGURE 2).

Figure 2. DOE cut plan.
A coupon serialization scheme was developed to maintain traceability of all the samples. After the experiment was completed at the PCB supplier, the boards and test coupons were sent to the design agent, where two PCBs per panel were removed and shipped to the testing agent. A thermal stress test was conducted in accordance with IPC-TM-650, Method 2.6.8, Test Condition C (three times at 232°C) on one board from each run at the same coupon locations (Figure 2). This thermal stress test verified that the new fabrication methods did not induce eyebrow cracks and that via plating integrity was maintained. The remaining three boards from each run were used to perform the 100-cycle thermal shock test as outlined in MIL-PRF-31032/1C, paragraph 4.7.6.3 (IPC-TM-650, Method 2.6.7.2) with temperature extremes of -65° to +125°C. When possible, all PCBs were run through the thermal chamber simultaneously to minimize test variation. The testing agent also ran the interconnect stress test on IST Coupon D, shown in Figure 2, through 100 thermal cycles at 150°C and performed resistance testing in a different oven run. The testing agent labeled the via coupons, in accordance with the naming convention, and prepared and inspected the coupons according to their internal process procedures.
A total of 360 samples (30 thermal shock PCBs, three coupons on each, four locations per coupon) was used for the DoE. A positive sample consists of a barrel that the testing agency identified as having a barrel crack. Multiple cracks on one barrel were considered one positive instance of a barrel crack. Coupons could have multiple barrels with cracks, and all barrels counted toward positive samples. To control possible influence from the inspection process, coupons were evaluated by the same inspector when possible. Documentation of any positive samples, including the barrel number as specified in Figure 2, the location of the crack on the barrel, an image of the crack, and a measurement of the crack, was required.
Results
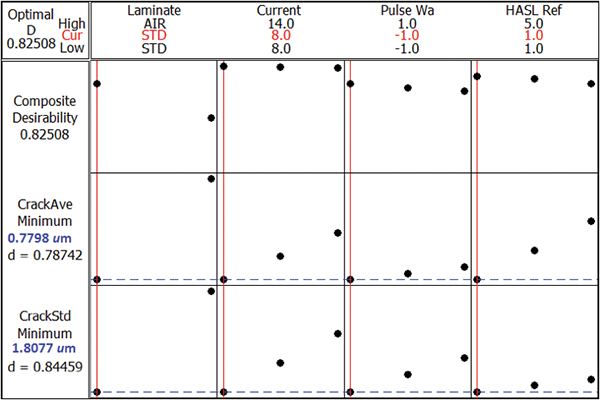
The optimization plot (FIGURE 3) indicates that, within the design space tested, the optimal settings to minimize crack length average (ave) and crack length standard deviation (std.) are as shown in TABLE 3.

Figure 3. Optimization plot of crack length average and standard deviation (optimal settings).
Table 3. Optimal DOE Settings

Figure 3 uses a composite desirability index, since the behavior of one response may differ from another response for certain factor settings. However, the response slopes for both the average and standard deviation are parallel, with the exception of HASL reflow, where the standard deviation slope is fairly flat. An ideal desirability index equals 1.0, which is a unit-less measure of how well the optimal DoE factor settings result in meeting the specification limits for the response variables. A goal (or target) of zero (i.e., no crack) was specified with an upper limit, which is required by the optimization scheme, equal to 33.0µm. The zero target, or no cracks, is weighted by a constant, ten on a scale of one to ten, since the goal is minimization of crack lengths. The predicted average crack length, if observed, is 0.7798µm with standard deviation of 1.8077µm. The composite desirability index, D, based on the separate desirability indices, d, for each response variable, equals 0.82508.
A binary logistic regression was conducted on the incidence of cracks. This analysis enables identification of significant factors with cracking as an attribute variable (i.e., 0: no crack, 1: crack). A summary is shown in TABLE 4.
Table 4. Logistic Regression on Crack Incidence Rate

The odds ratio indicates the likelihood of a crack occurring at that location based on changing one factor setting with the other factor setting held constant. For example, when changing from water to air for the laminate cooling method, with the same number of reflow cycles, the likelihood of cracking increases, on average, for both the 635µm PTH and buried vias, by 561% and 577%, based on the respective odds ratios of 5.61 and 5.57. For HASL reflow, the odds ratio is interpreted for each one-unit increase in reflow cycle. So, each additional cycle beyond one cycle, using the same laminate cooling method, increases the average likelihood of cracking by 25% to 77% (1.25 to 1.77), with buried vias at most risk. Note that the 457.2µm PTH results were not within the 0.05 significance threshold, which corresponds to 95% confidence. However, reporting the odds ratio is still useful for comparison purposes.
TABLE 5 summarizes the crack incidence rate for the DoE data and validates the odds ratio results in Table 4.
Table 5. Crack Incidence Rate

FIGURES 4, 5 and 6 portray box-and-whisker plots (a.k.a. “box plots”) for the response variable maximum crack length, whereby no crack is assigned a value of zero for these variable data. The median (50th percentile) values for each grouping are shown and correspond to the inner horizontal line within the box. The outer box edges represent the 25th and 75th percentiles. The “whiskers” are the minimum and maximum, with the exception of outliers (*) exceeding the interquartile range (75th minus 25th percentiles).

Figure 4. Box plot of maximum crack length (457.2µm PTH coupons).

Figure 5. Box plot of maximum crack length (635µm PTH coupons).

Figure 6. Box plot of maximum crack length (buried via coupons).
Box plots are useful for examining both the centering and variability of response data, as well as identifying outliers. Outliers may stem from measurement or data entry error and may warrant investigation, depending on the frequency and thus influence on the final analysis. In general, the buried via coupon type has the highest median values for most DoE factor settings, notably with air cooling, and 457.2µm PTH indicates the lowest crack lengths. The graphs are plotted on the same y-axis scale to facilitate comparing magnitudes.
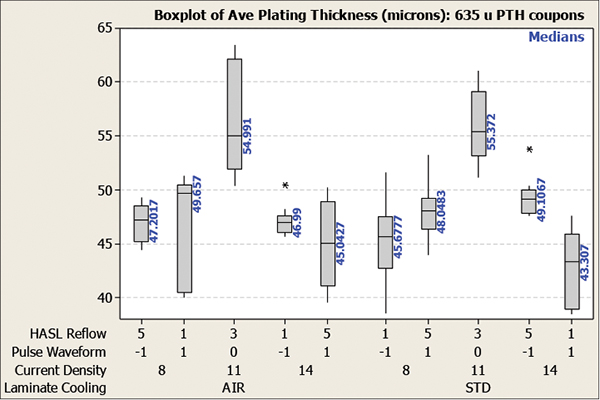
FIGURES 7, 8 and 9 depict the box plots for average plating thickness by coupon location. In general, the plating thickness of buried vias exhibits less variability than the other coupon types for most of the factor settings. All DoE factor settings and coupon locations meet the plating thickness specification minimum of 30.48µm (0.0012").

Figure 7. Box plot of average plating thickness (457.2µm PTH coupons).

Figure 8. Box plot of average plating thickness (635µm PTH coupons).

Figure 9. Box plot of average plating thickness (buried via coupons).
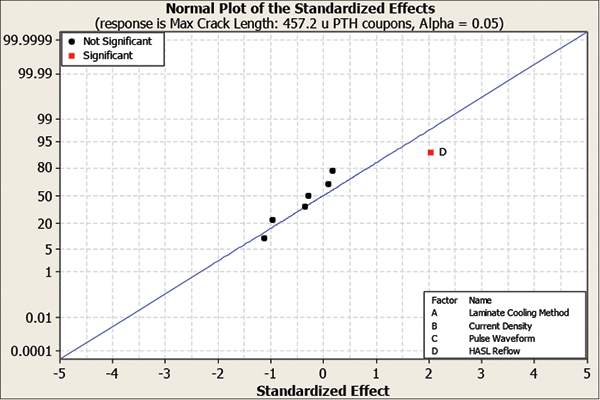
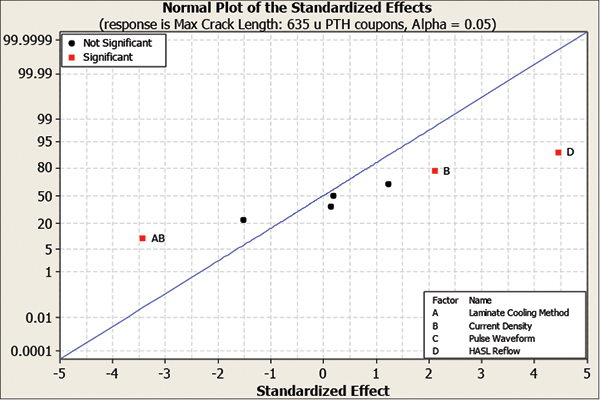
The data were separated by via type (457.2µm PTH, 635µm PTH, buried) to assess significant factors on the responses and to determine if any recommended settings differ from Table 3. A useful method to identify significant DoE factors is the normal probability plot of the effects. This plot is based on the premise of the normal distribution with z-score calculations and corresponding normal percentiles. Plot points that do not fall near the line, representing the “flattened” normal curve, usually signal important effects. Important effects are larger and generally farther from the fitted line than unimportant effects. Unimportant effects tend to be smaller and centered about zero. The plotted z-score not only indicates the relative magnitude but also the direction of the mean response. Since crack length should be minimized, the optimal setting for a negative effect is the highest (and vice versa for positive effects). For higher-order effects (e.g., AB inferring an interaction of laminate cooling method*current density), the corresponding interaction plot should be reviewed to determine the optimum.
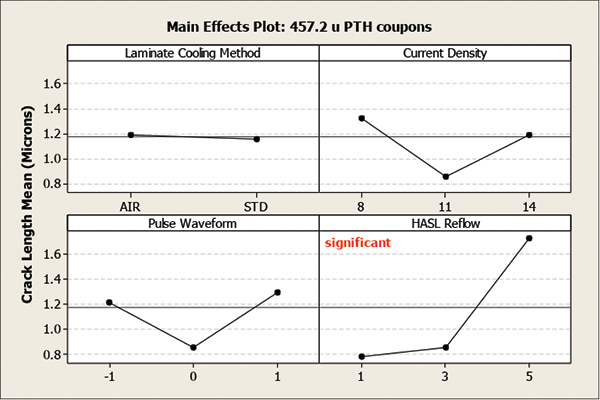
FIGURE 10 indicates that with 95% confidence (i.e., 5% chance of concluding that a factor is significant, when, in reality, the factor does not have an impact on the response), only HASL reflow, with the effect plotted in red, has a significant impact on maximum crack length for the 457.2µm PTHs. No significant interaction effects (e.g., laminate cooling*current density) are identified and are therefore not plotted for this via type. A plot of the main (or first order) effects (FIGURE 11) indicates that one HASL reflow is the preferred setting for 457.2µm PTHs, which corresponds with the optimal recommendations in Table 3.

Figure 10. Normal probability plot of the effects. Maximum crack length (457.2µm PTH coupons).

Figure 11. Main effects plot. Maximum crack length (457.2µm PTH coupons).
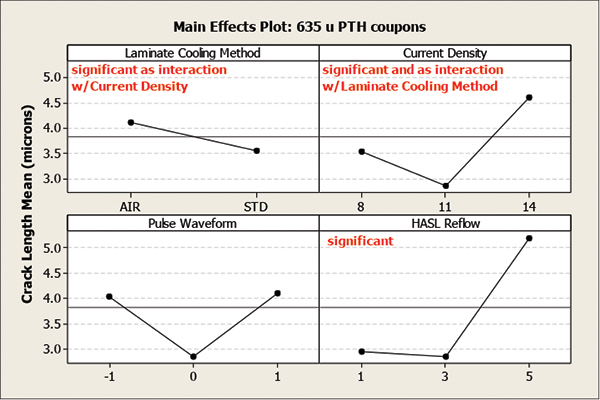
FIGURE 12 indicates that current density, HASL reflow, and the interaction effect, laminate cooling method*current density, are significant for maximum crack length for 635µm PTHs. FIGURE 13 indicates that one HASL reflow is preferred for 635µm PTHs, which corresponds with the optimal recommendations in Table 3. The significant interaction effect, identified in Figure 12, is interpreted by reviewing FIGURE 14.

Figure 12. Normal probability plot of the effects. Maximum crack length (635µm PTH coupons).

Figure 13. Main effects plot. Maximum crack length (635µm PTH coupons).

Figure 14. Interaction plot (laminate cooling method*current density). Maximum crack length (635µm PTH coupons).
The laminate cooling method* current density interaction is shown in Figure 14. Interactions are evident when lines connecting the mean values are not parallel, and a stronger effect is indicated by intersecting lines. In other words, the resultant mean is interrelated between two (or more) factor settings. Since this DoE is a screening design, only second-order interactions are analyzed. For water cooling, only current density 14 is statistically different (in this instance worse) than either current density 8 or 11, which are not statistically different. To minimize cracking for 635µm PTHs, water cooling is recommended in conjunction with current density 8 or 11. Thus, the optimal recommendations based on all locations, water cooling with current density 8 as presented in Table 3, remain substantiated.
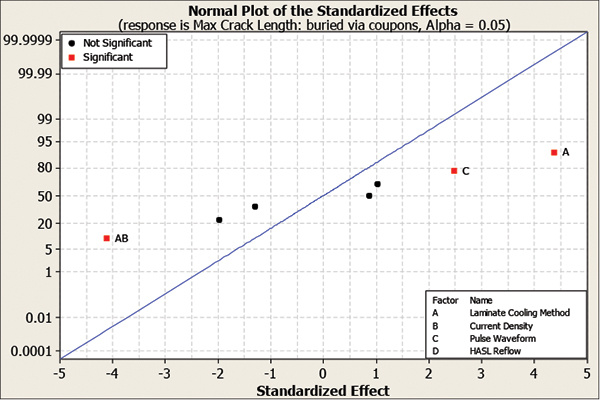
FIGURE 15 indicates that pulse waveform, laminate cooling method, and the interaction effect, laminate cooling method*current density, are significant for maximum crack length for buried vias.

Figure 15. Normal probability plot of the effects. Maximum crack length (buried via coupons).
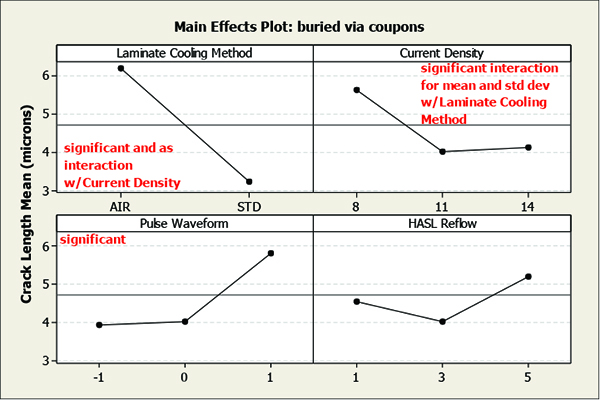
FIGURE 16 indicates the water cooling method and a pulse waveform not equal to a setting of 1 are preferred for buried vias, which corresponds with the optimal recommendations in Table 3.

Figure 16. Main effects plot. Maximum crack length (buried via coupons).
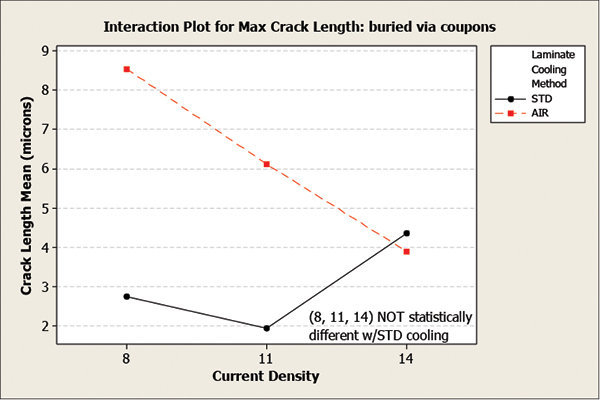
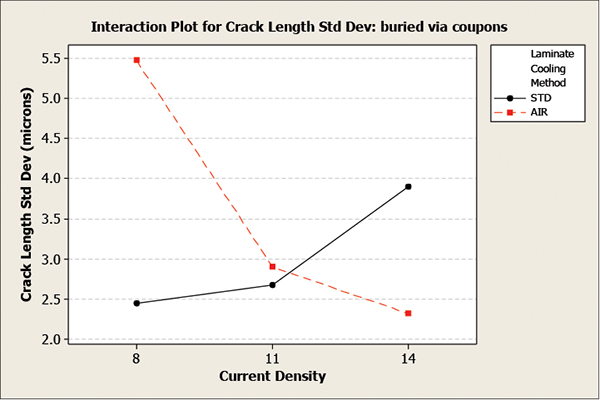
The laminate cooling method* current density interaction is shown in FIGURE 17. This interaction also impacted the maximum crack length standard deviation, as shown in FIGURE 18. For standard cooling, the current density settings (8, 11, 14) are not statistically different. Thus, the optimal recommendations based on all coupon locations, standard cooling with current density 8, as presented in Table 3, remain substantiated.

Figure 17. Interaction plot (laminate cooling method*current density). Maximum crack length (buried via coupons).

Figure 18. Interaction plot (Laminate cooling method*current density). Maximum crack length standard deviation (buried via coupons).
Conclusions and Summary
The research identified PCB fabrication processes that were significant contributors to not only the incidence of cracks but also the length of cracks, in copper-plated vias, after exposure to thermal shock excursions. Statistical analyses of the resultant DoE data identified the optimal settings for the four factors selected from the PCB fabrication processes.
The binary logistic regression indicated that the likelihood of cracking increased from 220% to 561% across all via types when changing from water laminate cooling to air cooling within the same number of HASL reflow cycles. Since plating is performed after the laminate cooling process, the influence
of the laminate cooling process on the likelihood of cracking is not readily apparent. Also, as the number of HASL reflows increased, the likelihood of crack occurrence increased from 25% to 77% across these via types, when holding the laminate cooling method constant. These results support the optimal recommendations of water cooling with HASL reflow of 1, as presented in Table 3.
For 457.2µm PTH, the only significant factor affecting crack length was the HASL reflow. For the 635µm PTH, HASL reflow was also the most significant factor on the length of barrel cracks. Other significant factors included current density and the second-order interaction effect between the laminate cooling method and current density. Figure 3 response slopes suggested a current density setting of eight would reduce crack length and standard deviation, notably due to the interaction plot shown in Figure 14, where a setting of 14 coupled with standard water cooling should be avoided. For buried vias, laminate cooling method (air) was the most significant factor affecting the length of barrel cracks, even though the plating is performed after the laminate cooling process. Pulse waveform setting of 1 was the second most significant factor. Other significant factors included the second-order interaction effect between the laminate cooling method and current density, shown by Figures 17 and 18, for the crack length average and standard deviation, respectively. This interaction effect further substantiated the optimal recommendations of standard cooling with current density 8, as presented in Table 3.
While the DoE was being conducted, the no-crack thermal shock requirement was reviewed for applicability against service life requirements. Multiple PCB coupon samples underwent close to 100 thermal shock cycles to determine when cracks initiated and to estimate crack growth rates. Engineering models estimated the service life correlating with 100 thermal cycles. This effort resulted in a relaxation of the crack criteria to permit up to 20% crack length of the specified minimum wall thickness.
Based on the results of this DoE, a follow-on experiment is desirable. Specifically, some of the variables under consideration include HASL versus hot oil reflow, conductive versus nonconductive buried via fill, and pulse waveform variation, while keeping plating thickness controlled.
Acknowledgments
This work was conducted under funding from the U.S. Navy Strategic Systems Programs Office to The Charles Stark Draper Laboratory under Contract Number N00030-13-C-0005. The authors thank Ted Jones and Matthew McQueen and their team at the Crane Division, Naval Surface Warfare Center for their outstanding contribution in providing input to the design of this experiment, preparation and inspection of all coupons, as well as data recording. Also, we thank Carl Colangelo of The Dow Chemical Company for his assistance with the DoE and his expertise in interconnect processes. The team at Viasystems Sterling should be commended for their dedication in preparing and executing the details of the manufacturing plan that satisfied the elements of this DoE.
Ed.: This article was first presented at IPC Apex Expo in February 2015 and is reprinted here with permission of the authors.
Edward Arthur is with Raytheon Space and Airborne Systems (raytheon.com); Charles Busa is with The Charles Stark Draper Laboratory; Melissa Durfee is with Raytheon Integrated Defense Systems; and Chad Gibson and Wade Goldman P.E are with Charles Stark Draper Laboratory; This email address is being protected from spambots. You need JavaScript enabled to view it..


