Evaluation of component physical form and fit equivalence of inductors and the implementation of new design review tools and rules.
When choosing an inductor for an electronic circuit, a designer must first select a component that meets inductance requirements to ensure proper electrical function. Inductance (SI unit of measure: henry) is the ratio of voltage to the rate of change of current across a device. Inductance is achieved within a component by using a variety of design options, including coil gauge, number of coil windings, coil diameter, and type of materials used to construct the inner core and outer package. Therefore, inductors with different inductance values often will have different physical dimensions. Component lead pitch, pad size, package standoff and component body sizes vary greatly across the inductor component family. This leads to the issue of inductor equivalence: when two or more electrically equivalent inductors are considered for use within the same electrical circuit.
Second, as component placement densities and power demands continue to increase within electronics products, there is less available space for via placement and surface trace routing on a printed circuit board. In many designs, these space constraints often drive signal trace and via placements on PCBs at or underneath inductor component body locations, and create significant potential for design-related reliability issues. Specifically, because most inductor package bodies are flush-mounted to PCB surfaces, and are composed of ferrite, MnZn, NiZn or other electrically conductive composite materials, potential for high impedance, intermittent shorting failures exists when vias and/or traces on a PCB are routed under them. As such, designing PCBs with wiring features present under inductor component body locations should be avoided (or preferably eliminated altogether) to circumvent potential for high-impedance failures.
As shown in FIGURE 1, there are also a wide variety of first-level coil inductor package constructions available from component suppliers. These package constructions include inverted L, bottom terminated, and C-shape configurations (among others). The reason for this variety results from a general lack of industry standards for inductor packaging, as defined and controlled by JEDEC, IPC, ECIA or other industry standards groups.

Figure 1. Wide variety of coil inductor package formats.
The large variety of inductor package formats and absence of packaging standards clearly emphasizes the importance of understanding inductor equivalence for bill of materials (BoM) component selection and further underscores the general need to design PCBs that avoid placement of conductive features such as vias, c-lines, or power/ground shapes under inductor bodies.
Scope
Work was conducted in several areas to help improve inductor physical equivalence checks. Once equivalence was confirmed, a second set of checks was established to ensure risk of inductor shorts was minimized. The work spans inductor packages used in high-reliability enterprise server and storage class hardware systems.
Intent. The intent of the work was to:
- Define key elements of inductor equivalence requirements; what determines inductor equivalence?
- Ensure inductor equivalence can be accurately measured when two or more part numbers are used within a single reference designator location, within a PCB design – during the bill of materials component selection process.
- Ensure conductive features within inductor package keep-out areas are minimized or eliminated to ensure high-reliability operation of the electronic circuit.
- Develop automated software tools to conduct inductor equivalence checks and physical design keep-out checks during design review process steps.
Approach. To ensure a robust and reliable design that could incorporate multiple inductor part numbers within a single reference designator location, a two-step process was implemented.
First, inductor part number equivalence was determined for multiple part numbers considered for use with a single reference designator. If multiple parts were deemed equivalent, then the next step of physical design keep-out review could occur. If multiple parts were deemed not to be equivalent, then additional actions were taken, including finding alternate part numbers, copper pad modifications to accept multiple part pin geometries, or single sourcing the component.
Once multiple part numbers were deemed equivalent, a single component symbol was added to the PCB physical design, able to accept multiple part numbers. Automated checks were then run to ensure conductive features were minimized (or eliminated) from under inductor body keep-out areas.
Inductor Physical Packaging Variation
FIGURE 2 shows an excerpt of 80 commonly used sample inductor packages commercially available today. The figure clearly illustrates the large variation in inductor physical dimensions spanning multiple inductor suppliers. Differences in body sizes, pin dimensions/counts/pitches are evident.

Figure 2. Inductor packages – dimension variation.
As mentioned, the reason for component design variation results (in part) from the absence of inductor component industry standard controls (JEDEC / IPC / ECIA). For example, the package family is not included in JEP95, “JC-11 Committee on Mechanical Standardization,” and is not included in IPC-7351, “Generic Requirements for Surface Mount Design and Land Patterns.” Inductor guidance is considered out of scope for these guidelines.
As stated in the introduction, inductance is achieved within a component by using a variety of design options (FIGURE 3), including coil gauge, number of coil windings, coil diameter, and materials used to construct the inner and outer package. Therefore, inductors with different inductance values often will have different physical dimensions, as well as different component lead pitch, attach pad size, package standoff, and component body size within an inductor component family.

Figure 3. Sample construction showing windings and leads.
In the absence of industry standardization, and dependence of internal packing physics on inductance, inductor physical dimensions have been left to individual component suppliers. Thus the reason for such large variation within this component family.
For these reasons, it is important inductor equivalence be well understood and evaluated if multiple part numbers are to be used on a common reference designator.
Inductor equivalence. Several factors define inductor component equivalence, which include both electrical and physical dimension attributes, represented by the equation
Inductor equivalence = Form + Fit + Function
where
Function = electrical equivalence
Form, Fit = physical dimension equivalence
This simple equation states that in order for two or more inductors to be equivalent, equivalency must be confirmed from an electrical standpoint and from a physical dimension standpoint. Extensive work conducted as part of this study showed many cases where inductor equivalence has been claimed on the basis of only electrical/functional requirements. Physical dimension equivalence (form, fit) checks have been shown to be insufficient, and the lack of equivalence has been correlated to lower assembly yields, reduced second-level reliability performance, and high impedance intermittent shorts.
Ensuring Form and Fit Physical Equivalence for Inductors
The following sections discuss key elements to evaluate form and fit equivalence for inductors. Topics include supplier print dimension reviews, temperature sensitivity differences, and an overview of a new automated equivalency tool developed to quickly and accurately determine equivalence.
Component supplier prints. The first step to ensure form and fit equivalence for inductors is to fully review the supplier data sheet for each component. Although at first glance, physical designs may look similar, work conducted within IBM has shown there can be a number of subtle, yet important differences between supplier recommended layouts. Since inductor packages are not standardized (as described in earlier sections), the question at this point in the design process is: Are the inductors under evaluation similar enough to be considered physically equivalent? To help answer this question, and for illustration purposes only, two similar inductors are shown in FIGURE 4 and FIGURE 5. Two primary dimension sets require evaluation on the prints, including component dimensions and recommended PCB copper land patterns. As can be observed, dimensions from each supplier print are quite different and drive the need to answer two critical questions to ensure design compatibility: 1) Are the respective dimensions of each component close enough to deem physical equivalence, and 2) can these two different inductors be placed interchangeably onto a single reference designator location within a PCB design?

Figure 4. Supplier A recommended inductor land pattern.

Figure 5. Supplier B recommended inductor land pattern.
Temperature sensitivity. Another important factor in determining inductor equivalence is the evaluation of component temperature sensitivity. Base temperature sensitivity of inductors is defined within J-STD-075, Table 11-1, “Inductors and Transformers with Insulated Wire Type Coils.”1 Classification temperature within the table refers to requirements listed in J-STD-020, Table 4-2,2 with limits defined by the inductor package thickness and volume (FIGURE 6).

Figure 6. J-STD-020 Table 4-2: Classification Temperatures based on Package Thickness and Volume.
Figure 6 sets the maximum allowable peak temperature exposure during thermal assembly operations. Limits vary between 245°C – 260°C. Inductors that have ratings <260°C should be considered process-sensitive. Therefore, if package volumes vary greatly between two inductors, allowable process exposures may also be different. Thus, inductors from a temperature sensitivity and assembly standpoint may not be considered equivalent.
Automated equivalence tool. As discussed, there are many variables to consider when evaluating inductor equivalence:
- Electrical function requirements (inductance).
- Package body, lead, pitch dimensions.
- Temperature sensitivity differences between packages.
- Component package configuration (inverted L, bottom terminated, C-shape).
- Supplier-recommended PCB copper footprint layouts. Inductor suppliers do not always design for IPC standard solder joint fillets. It is recommended to compare supplier recommendations versus IPC standard fillet requirements.
- Inductor suppliers update recommended part footprints to expand their inductor family commercial offering over time. New recommended footprints easily can be missed, and new footprints may not fit on old parts. For this reason, it is important to perform a detailed inductor physical layout review.
For the large number of inductor part numbers commercially available on the market today, and the large number of variables that must be assessed to determine equivalence, an automated software tool was developed. Manual review of the large number of checks was determined to be slow, cumbersome and prone to errors. Thus, a new automated tool was developed to reduce workloads, and improve assessment speed and accuracy of equivalence checks.
FIGURE 7 shows the interface dashboard for the automated tool. The top section contains user buttons to perform a variety of tasks, including loading supplier part number information and CAD symbol information. The middle sections (in green) display critical variables of interest used to compare equivalency for the inductors under review. Sections in blue are output calculations and responses made by the tool when determining equivalency. The output helps detail any physical dimension differences between inductors. Calculations can be made against supplier recommendations and/or IPC requirements.

Figure 7. Automated equivalence tool dashboard.
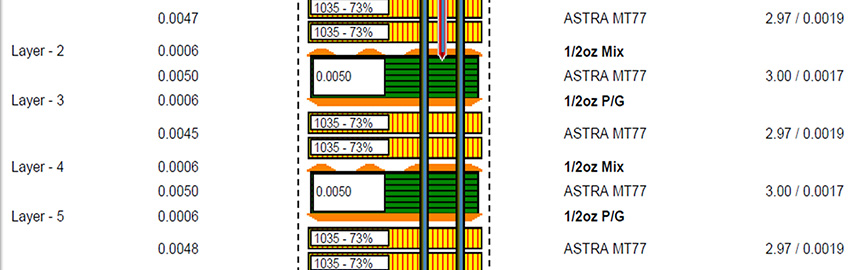
While the calculations made with the dashboard are an essential part of the tool, working with such small numbers is often hard to visualize. Therefore, a dynamic drawing tool function was also incorporated (FIGURE 8). All dimensions are drawn to scale, with design values listed within each image. The component body, component leads, and PCB copper pads can be compared to scale, side by side, helping improve the overall confidence level of the assessment.

Figure 8. Dynamic drawing of inductors for comparison.
The automated tool was intended for use early in the design cycle, during bill of material selection process steps. If equivalency issues are identified early on, changes to the BoM can be made to accommodate use of alternate part numbers, or inductors provided from a single supply source.
The basis of the tool was designed using IPC fillet sizes with supplier layout recommendations. In summary, the automated equivalence tool has many features, including:
- Compatibility with imperial or metric units.
- Dynamic drawing tool for visualization and comparison.
- Determines both electrical and physical equivalence.
- Component information can be imported from existing component and symbol libraries.
- Manual dimension entry or component library loads.
- Can manually override data to model alternate options.
- Displays copper pad range to enable dual usage.
Physical Design Considerations
Once multiple inductors have been deemed electrically and physically equivalent, a component physical symbol can be placed on the PCB design. The inductor location is subsequently wired to other electronic components necessary to complete the circuit. As component population densities continue to increase on a PCB, other conductive features often crowd (or violate) inductor keep-out areas, including sensitive nets, via routings and power/ground shapes.
To ensure reliable operation of an inductor within a functional circuit, several material and physical design elements must be taken into consideration.
It is important to understand inductor packaging materials, second-level package constructions, and PCB topology changes near inductors. The following sections discuss these elements. The final section includes an overview of a newly developed automated check capable of detecting and reporting issues based on updated inductor design rules.
Inductor materials. By design, inductor package bodies are conductive using ferrite first-level packages (8 to 40Ω range). Ferrite materials are ceramic compounds using transition metals with oxygen. Iron oxides are combined with Ni, Zn or Mn, used for their excellent magnetic properties. Commercially, the majority of inductor component bodies are made using MnZn or NiZn.
Therefore, if an inductor contacts an exposed PCB copper feature under its own component body, a short can occur.
Last, it should be noted insulation materials are not always present on inductor bodies. Presence of an insulator coating will vary from supplier to supplier or from part family to part family. Some parts have insulation coatings; some do not. This variation has also been noted within single suppliers across multiple part numbers.
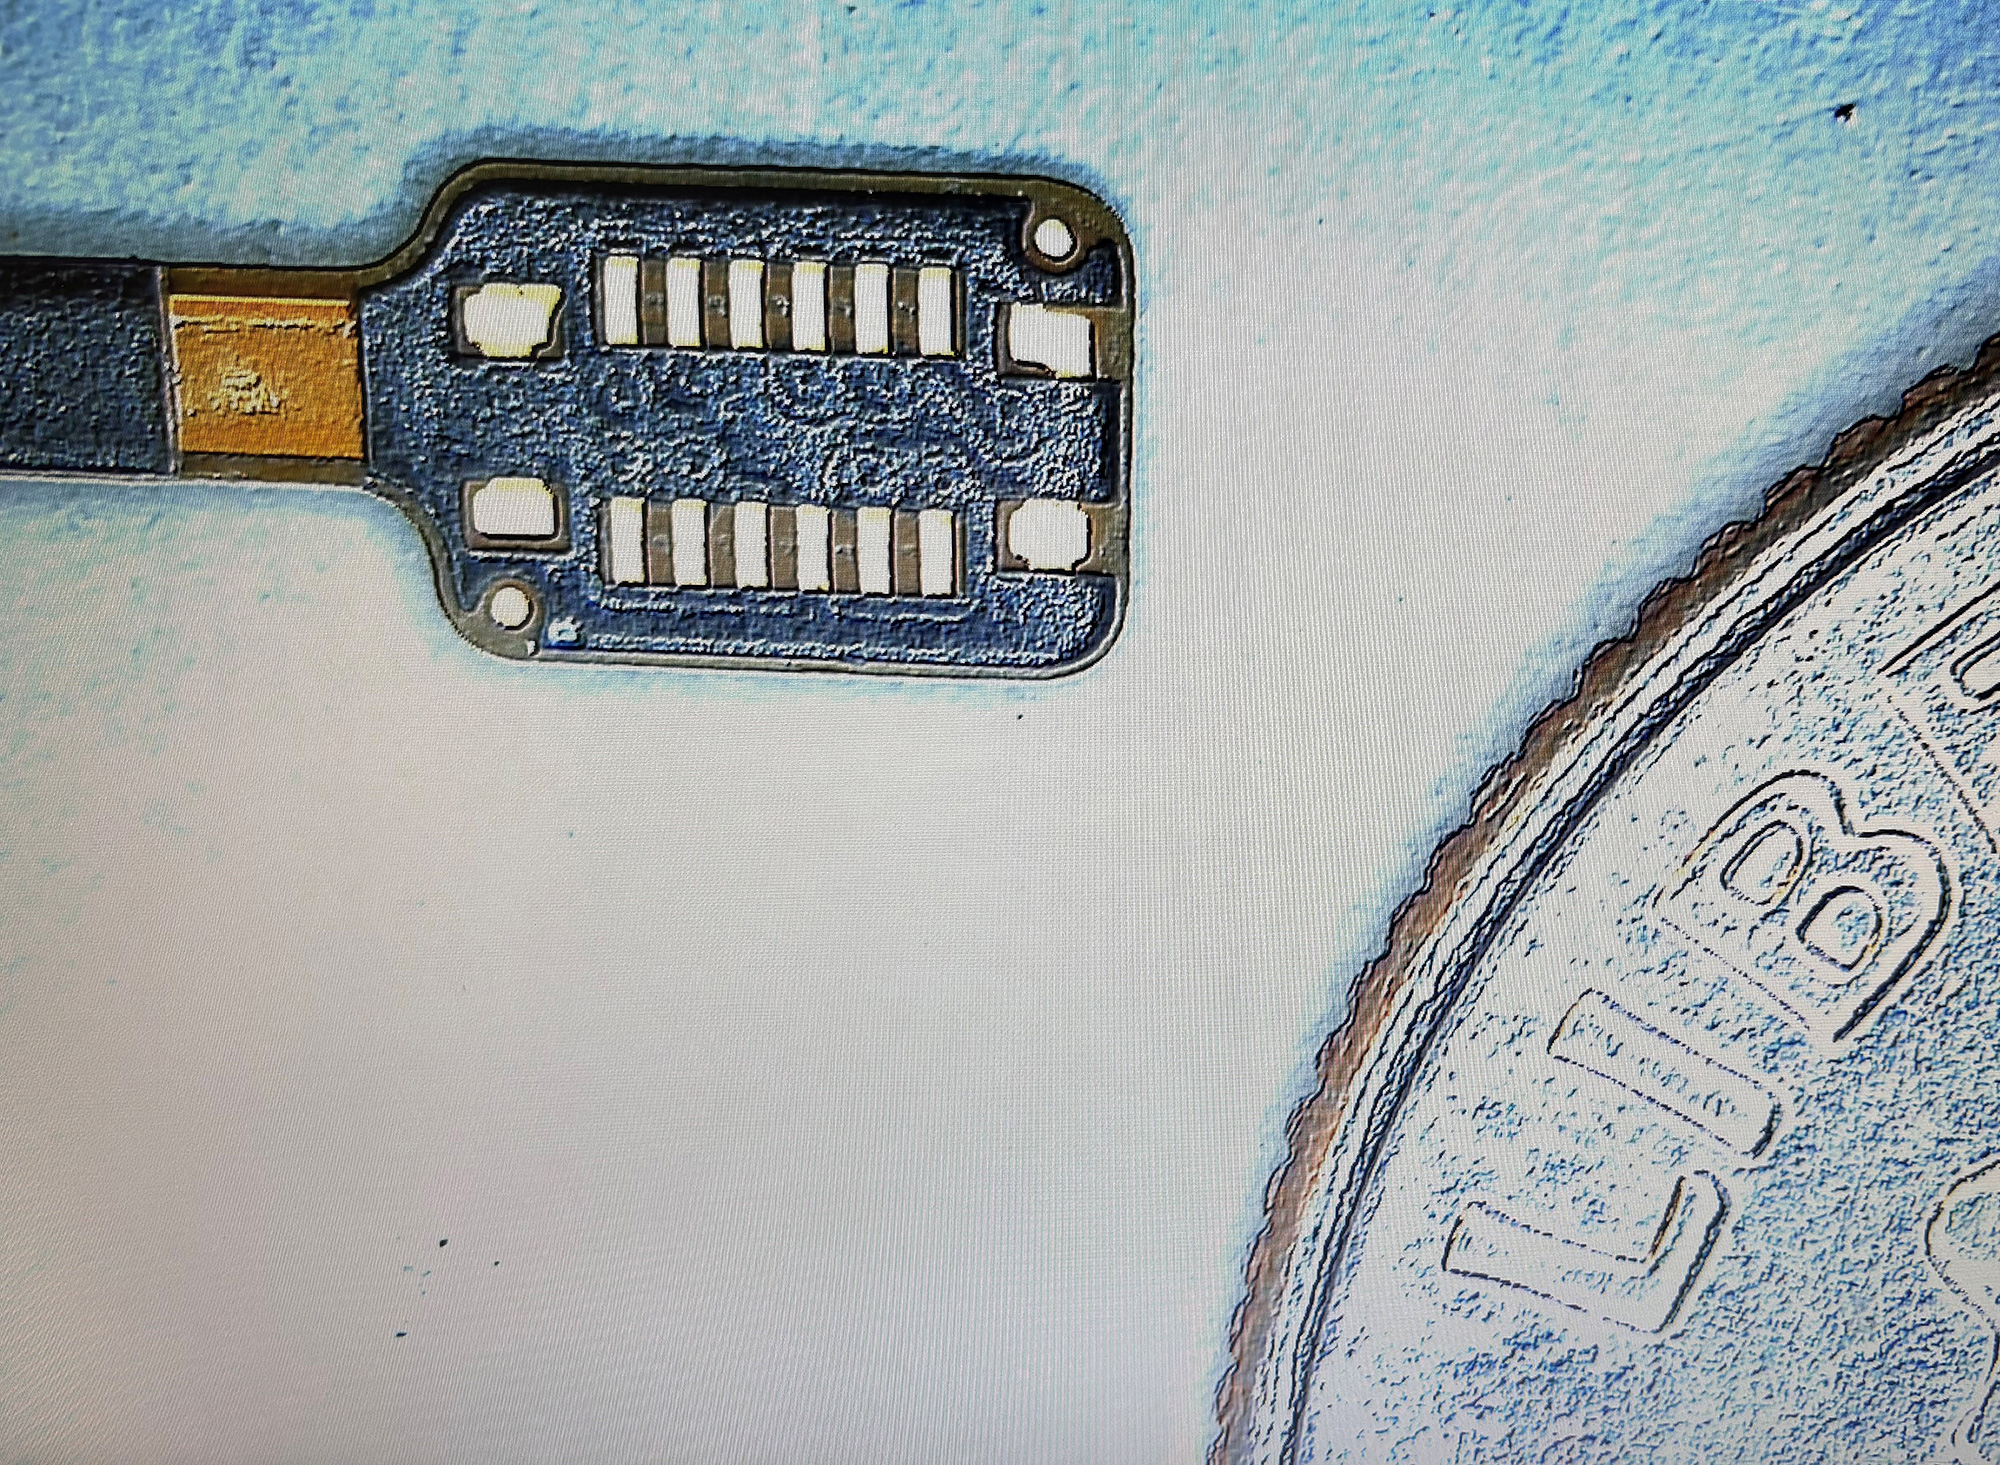
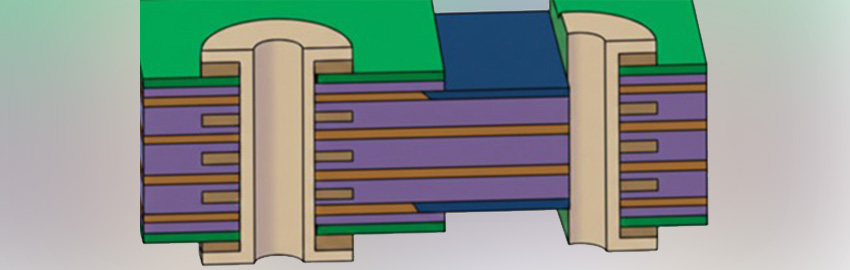
Inductor packaging construction. An important observation made was the large variation in inductor packaging construction. FIGURE 9 provides an example to highlight key features examined, including the following:
- Inductors sit flush on the PCB surface.
- Minimal inductor standoff to the PCB.
- Large number of inductor styles and constructions.
- Inductor packaging not industry standard controlled.
- Entrapment cavities under inductors were noted. Some package styles can entrap assembly materials, including flux that could lead to corrosion or dendritic growth risks.

Figure 9. Sample inductor construction elements.
In Figure 9, the upper left image shows an entrapment cavity; the upper right image shows how inductor bodies sit flush to the PCB; the lower left image shows cross-section with internal windings; and the lower right image inductor underbody “T” shape.
Raised PCB vias after thermal exposure. To understand if there were any dimensional topology changes resulting from thermal assembly process exposure, laser height measurements were taken (FIGURE 10).

Figure 10. Laminate shrinkage / raised vias.
Laser height measurements. With the surface power plane (with solder mask) set as the zero datum, the following nominal measurements were taken:
Silk screen +19µm
Laminate at Via 1 -4µm
Laminate at Via 2 -1µm
The results confirm PCB laminate material shrinkage after Pb-free thermal reflow exposure. The work shows vias and traces under inductors can come into contact with an inductor body.
Most important, the data showed copper features nominally can be only 20µm (0.78 mils) below a conductive ferrite inductor body.
Shorting risk contributing factors. The study showed seven contributing factors that could lead to an increased risk of inductor shorts to the board (FIGURE 11):
- Conductive ferrite inductor body construction.
- Insulation protection varies by part.
- Inductors sit flush to PCB, with minimal standoff.
- Vias and signal lines are often placed under inductors.
- Raised vias and laminate shrinkage occur after reflow.
- Additional variation comes from the hardware manufacturing process; areas to understand include component tilt, PCB bow and twist, and flux soldering workmanship.
- High risk of inductor-to-PCB shorts and inductive noise impacts to sensitive analog nets, if vias and nets are improperly placed under the inductor.

Figure 11. Contributing factors to inductor shorting.
When individual tolerance ranges are added to the construction stack-up, it has been shown conductive features may be as close as 20µm (0.78 mils) from conductive ferrite inductor bodies. This “tolerance analysis” approach shows the importance of minimizing/eliminating signal and via placement under inductor bodies.
Design rules. Since incoming inductor package variation is very high, the use of specific design rules during the physical design stage of a PCBA should be applied to minimize potential for inductor to PCB shorts.
It is important that design rules for inductors be updated to minimize via, signal trace and power/ground shape placement under inductor component bodies (package keep-out area/place bound area). Vias and traces placed under inductor bodies require a detailed review. If circuitry is required under inductors for functional needs, they should be fully reviewed. If not needed, efforts to relocate vias and/or reroute lines out from under inductor bodies is recommended.
Physical design rule checks. Since inductor part usage on printed circuit board assemblies is often quite high, the ability to review many instances accurately and quickly becomes very important.
A new automated set of checks was developed as part of the study. These checks (FIGURE 12) were designed to scan an entire card (using an electrical CAD system), examining all instances of vias, nets and copper shapes under inductor bodies. The output highlighted all flagged issues and x/y coordinate locations supporting iterative design changes.

Figure 12. Automated ECAD inductor placement check.
FIGURE 13 shows before and after design characteristics of an inductor when applying automated inductor checking. Many vias were physically moved from under the inductor body; the automated check flagged all violation locations, and subsequent design changes were made.

Figure 13. Before and after images using automated inductor check.
Summary
Given that inductor physical dimensions change with inductance values, component placement densities continue to increase, and inductor packages are not industry standard-controlled, it is important to confirm inductor package electrical and physical equivalence when multiple part numbers are used within a PCBA design.
A two-phased approach was used in the study to first drive inductor equivalence early on in the design process (bill of material selection), and then once deemed equivalent, ensure an inductor body keep-out area is as open as possible. It is important to understand what vias and nets are needed for inductor operation, versus other external circuits that could be moved.
Automated tools were developed for both phases of work to drive fast, repeatable, thorough and accurate measurements and comparisons. The tools helped with workload bandwidth, and could handle multiple reference designators and top and bottom sides of cards. Processing times for the inductor analysis ranged from 1-5 hr. using the automated tools. Actual check runtimes to generate output analysis reports ranged from 1-3 min. The balance of time was used for output report review by subject matter experts, and case-by-case reviews of flagged issues produced by the checks.
Industry awareness of this issue is helpful to drive standardization of inductor packages offered by component suppliers.
Approaches and tools developed within the study helped improve inductor design, assembly, and reliability understanding and risks. This added capability helps support a design for excellence (DfX) “shift left” approach. For additional reading on the importance of the DfX methodology, additional references are cited.3-7
Recommendations
Resulting recommendations from the study include:
- Be aware coil inductor package bodies are conductive by design, using ferrite first-level packages. Bodies can short to conductive PCB features under the component.
- Inductors are not industry standard-controlled; it is recommended inductor suppliers and industry standards groups work together to create common design guidelines moving forward.
- Ensure inductor part equivalency checks are based on electrical and physical dimension analysis. Form, fit and function must all be evaluated.
- Automation of inductor equivalency tools helps drive faster, more accurate and more thorough reviews.
- Automated physical design tool checks can be used to minimize via placement and signal line routing from the package keep-out area. Output reports generated by the check should be subsequently reviewed by a subject matter expert to determine if a design change is required.
- Inductor design rules should be updated to avoid inductor shorting risks. The design point goal should be to minimize via, signal trace, and power/ground shape placements under inductor component bodies.
- Inductor suppliers do not always design for IPC standard solder joint fillets. Therefore, it is recommended to compare supplier recommendations versus IPC standard fillet requirements.
- Inductor suppliers update recommended inductor part footprints to expand their inductor family commercial offering over time. New recommended footprints can be easily missed, and new footprints may not fit on old parts. For this reason, it is important to perform a detailed inductor physical layout review.
Acknowledgments
The authors would like to thank Don Heintz, Pat Sobotta, Zoltan Barabas, Jim Bielick, Mark Hoffmeyer, Marie Cole, and Robert Cremins for their contributions to this study.
Ed.: This article was originally presented at SMTA International in September 2017 and is republished here with permission of the authors.
Matt Kelly is senior technical staff member, Mitch Ferrill is senior engineer, Mark Jeanson is advisory engineer, and Jesus Montanez is power integrity engineer at IBM (ibm.com); This email address is being protected from spambots. You need JavaScript enabled to view it.. Timothy Jennings is ECAT engineer at Celestica (celestica.com).
References
1. J-STD-075, “Classification of Non-IC Electronic Components for Assembly Processes,” August 2008.
2. J-STD-020E, “Moisture/Reflow Sensitivity Classification for Nonhermetic Solid State Surface Mount Devices,” December 2014.
3. Matt Kelly, et al, “Via-in-Pad Plated Over (VIPPO) Design Considerations for Enterprise Server and Storage Hardware,” SMTA International, September 2015.
4. Matt Kelly, et al, “Via-in-Pad Design Considerations for Bottom Terminated Components on Printed Circuit Board Assemblies,” SMTA International, September 2014.
5. John McMahon, P.E., et al, “Strain Rate and Cyclic Strain Dependencies of PWB Pad Crater Susceptibility,” SMTA International, October 2013.
6. Matt Kelly and Mark Hoffmeyer, “Lead-Free Assembly Design for Manufacturability Considerations,” International Conference on Soldering Reliability, May 2012.
7. Matt Kelly, et al, “Lead-Free Supply Chain Management Systems: Electronic Card Assembly & Test Audit and Technology Qualification.”