Options to improve flex circuit flexibility.
“This part has six flex layers and will be impedance-controlled. Will I be able to bend it into the assembly at a 0.35" radius?”
I often hear this question, and it is valid; after all, it is a flex circuit. The answer depends on a number of factors: material selection, bend radius, bend angle, flex length, overall construction, and end use.
IPC-2223, Sectional Design Standard for Flexible Printed Boards, has historically contained a set of formulas to assist in determining minimum bend radius. They were based on the thickness of the part, as well as an acceptable limit of elongation. Depending on the number of bend cycles and circuit construction, the answer could range from a 1:1 radius-to-thickness ratio up to 88:1.
Industry consensus is the formulas may not be accurate or complete. As a result, the upcoming revision to the standard proposes to eliminate the formulas and use two simple rules-of-thumb, as follows:
- One- and two-layer flexes may be bent at a 10:1 radius to thickness ratio.
- Multilayer flexes may be bent as tight as 20:1.
Of course, that is not where the story ends. As with all rules-of-thumb, they are often broken. The key is to understand what is happening when you break the rules, so you can justify your design decisions.
Materials in the stackup define stiffness. The polyimide film acts like a spring; it wants to revert to flat after being bent. The copper is soft and tends to hold shape after bending. The adhesive acts like a shock absorber, stretching and compressing with the stresses caused by bending the flex circuit. The overall thickness and ratio of material in the stackup have an impact. As the thickness and layers of copper increase, the part gets more difficult to bend and acts like a solid piece of metal. Thicker polyimide has a different effect; it will increase the spring-back effect.
The bend itself is key. What is the angle of bend: 45˚, 90˚, 180˚? Will it have one radius or an S curve? The larger the degree of bend, the greater the differential stress from inside radius to outside radius. Short flex sections are more difficult to bend simply because there is less material to spread the stresses across. There are several strategies to maximize flexibility. Certainly, thinner is better, but that is often not an option.
For one- and two-layer circuits, the best option is to keep the copper as close to the neutral bend axis as possible. This will minimize stress on the copper, and will provide the highest number of bend cycles to failure. Minimizing or eliminating copper plating in the bend zone helps keep the part more flexible as well.
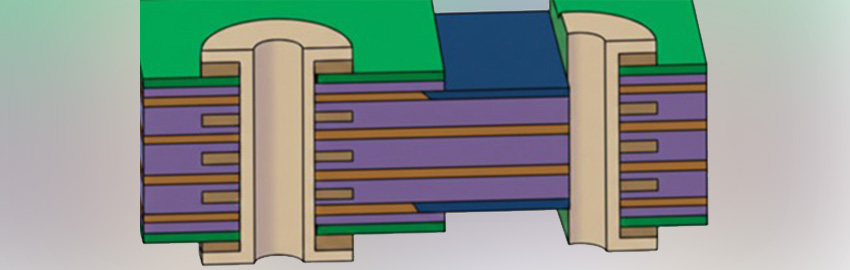
For multilayer circuits, we can consider fully bonded vs. unbonded flex zones, where we have several flex “leaves” that are loose from each other. These can act independently and reduce stress. When bent, the compressive stress will cause a buckle on the inside radius. The inside loose flex will buckle inward. In loose leaf constructions that have an S bend, the two bends cancel out any excess material, relieving most of the compressive stress.
Another option to improve flexibility is to selectively remove layers, if not all flex layers are needed in the flex region. This can be done by simply etching away all unneeded copper or removing coverlayers and substrates, if possible. Some designers will arrange all the signals crossing the flex zone such that they can remove entire substrates, or at least a coverlayer, if traces are removed from an external flex layer.
In some cases, designers will use crosshatch patterns to remove 30% to 70% of the copper from plane layers, which aids flexibility. Interestingly, this crosshatch strategy can pay huge benefits in impedance designs. Crosshatch patterns significantly increase impedance. As a result, we can reduce dielectric thickness, while maintaining impedance values.
Another plane layer option is to consider foil thickness. Is 1 oz. copper really needed, or could 0.5 oz. or 12µm be used? In addition to thinner copper providing more flexibility, it also allows thinner adhesives, so it is a two-for-one proposition.
In cases where rules-of-thumb are significantly exceeded, calculations can estimate the amount of strain the bend may induce. Calculate the arc on the inside and outside radius of the bend. Start by calculating the arc of the bend, assuming the part will be bent around a mandrel that has the radius of the planned bend. Call that the inside arc length. Now, add the thickness of the part to that inside radius and calculate the arc length again to find the outside arc length. Next, take the delta between the two arcs and divide by the inside radius. This returns a value of elongation. This method assumes the inside radius of the part is at neutral stress, and all the stress is expressed as stress on the outside radius. It is a worst-case assumption, as it does not account for any compression on the inside. It also does not account for any stress relief from the adhesive. You can look at this elongation value and make a value judgment on acceptable elongation.
Finally, when all else fails, consider having a mechanical mockup made. By stacking up all the materials, laminating them and then routing to final shape, you can get a relatively quick mechanical sample to validate your conclusions.
Nick Koop is senior field applications engineer at TTM Technologies (ttm.com), vice chairman of the IPC Flexible Circuits Committee and co-chair of the IPC-6013 Qualification and Performance Specification for Flexible Printed Boards Subcommittee; This email address is being protected from spambots. You need JavaScript enabled to view it.. He and co-“Flexpert” Mark Finstad (This email address is being protected from spambots. You need JavaScript enabled to view it.) welcome your suggestions.