How Rigid-Flex PCB Design Configurations are Advancing
Odd-layer-count boards are not only manufacturable, but at times preferable.
Today’s rigid-flex circuit board materials, stack-ups and constructions now permit a variety of advanced design configurations. These options create significant opportunities to achieve higher levels of design integration and packaging density within a given design.
Many new designs are manufactured with substantially higher flex layer counts. Some more prevalent designs include those with blind and buried via structures, integrated ZIF connections, and even designs with components mounted into both the flexible and rigid sections.
Some rigid-flex printed circuit board (PCB) designs may have flex areas that require shielding for electromagnetic interference (EMI) or radio frequency (RF) considerations. Others have varying thicknesses between the different rigid areas, as well as asymmetrical constructions.
This article covers some of the more common types of configurations and combinations generating interest among OEMs. Many additional configurations and combinations are available for flex and rigid-flex circuit board stack-ups, however. The more advanced constructions covered here include odd-layer-count constructions, asymmetrical constructions, varying flex layer count designs, integrated ZIF connections, blind and buried vias, air gap flex layer constructions, multiple rigid area thicknesses, and shielded flex layers.
Standard rigid-flex PCB constructions. FIGURE 1 is an example of what is considered a standard rigid-flex PCB construction. This will act as a baseline for later examples. Generally, a standard rigid-flex PCB design has a symmetrical construction. This type of symmetrical design also permits impedance control.
As shown in Figure 1, the flex layers are in the center of the construction, with even layer counts in both the rigid and flex areas. In the two thicker areas, the rigid areas, there is an even layer count. In this example there are six layers, but layer count could range from four to 16 or more. The key element in this design is the flexible layers are located in the center of the construction.
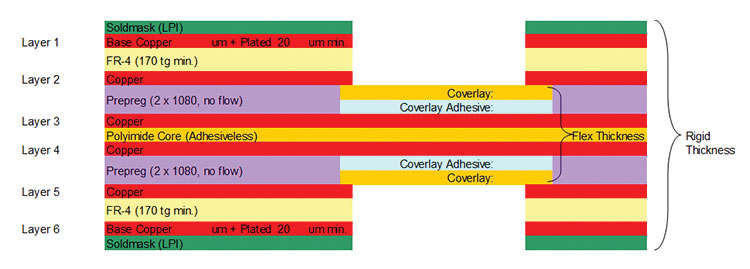
Figure 1. Standard six-layer rigid-flex construction.
Rigid-flex PCB constructions with odd layer counts. FIGURE 2 displays an odd-layer-count construction. Most engineers are familiar with rigid board design, for which even layer counts are a requirement. Although an odd layer count is a lesser known design, it is manufacturable and has its own set of benefits.
Figure 2 shows a seven-layer rigid board with three flexible circuit layers. This odd layer construction is primarily used for designs that require two-sided shielding in the flex areas, which are mostly driven by stripline impedance control. Some designs may have RF and EMI considerations. The ground/signal/ground construction is contained within the three layers of flex. It can also permit a large number of interconnects between rigid sections.
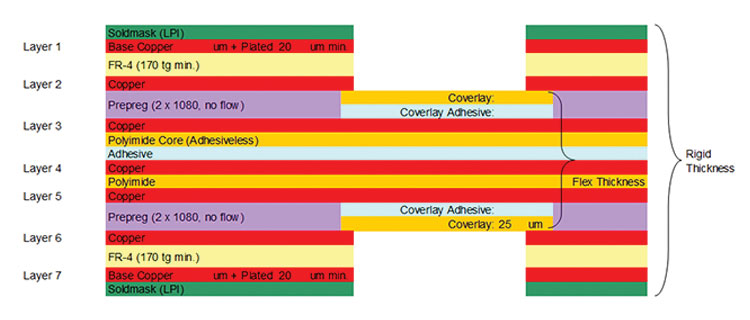
Figure 2. Odd layer count rigid-flex construction.
The stack-up example illustrated in FIGURE 3 is more simplistic. This rigid-flex construction has been designed with five layers in the rigid area and only one layer of flex for part numbers that have a minimal number of rigid to rigid interconnects. It also provides a high degree of flexibility and reduces costs.
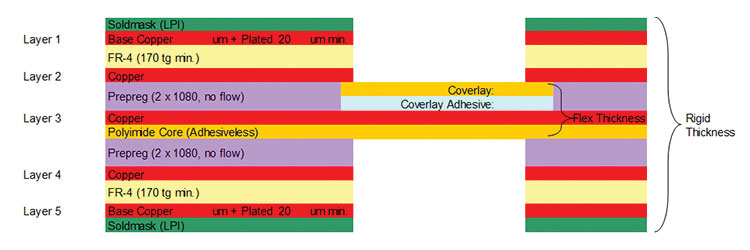
Figure 3. Five-layer rigid-flex construction.
Odd-layer-count constructions, as shown in the previous two examples, apply to both the flex and rigid areas and are independent of each other. A board could have an even layer count on one side and an odd layer count on the other end, provided the design requires it. The primary advantage is it minimizes the flex area thickness, which provides improved flexibility, increased mechanical bending capabilities, and, as a result, improved mechanical bend reliability.
Bend reliability and constructions are compliant with IPC-2223C, Sectional Design Standard for Flexible Printed Boards, to ensure parts have short- and long-term reliability. Last, to a certain degree, odd layer counts can help reduce the cost of the design by minimizing the total number of flex layers specifically required in the design.
Asymmetrical rigid-flex PCB constructions. Asymmetrical designs are the next rigid-flex PCB construction. The applications for an asymmetrical construction are typically driven by some very complex impedance requirements, where there are widely varying dielectric thickness requirements within the design. These can also be caused by blind via constructions, where the asymmetrical design construction permits the blind via aspect ratio to be reduced, which, in turn, improves the manufacturability and reliability of parts.
Given the unbalanced build, some warp and twist may occur within the assembly array. This may require a hold-down fixture to permit the assembly arrays to be transported through the assembly process.
FIGURE 4 is an eight-layer rigid-flex PCB asymmetrical construction. The flex layers are no longer located in the center of the design. Instead, they are shifted down toward the bottom. This type of stack-up is still in a manufacturable configuration. There are no major manufacturing concerns, aside from some warp and twist that may be induced in the assembly array.
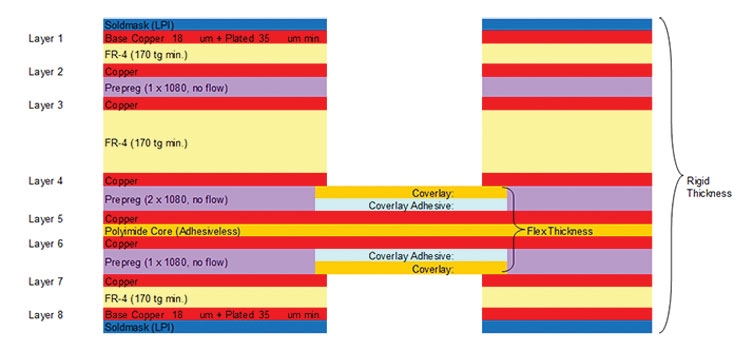
Figure 4. Asymmetrical rigid-flex circuit board construction.
Varying flex layer count. Another type of construction seen on a regular basis is where the flex layer count varies between rigid sections. For example, if there are three rigid sections, three or four flex layers might be joining the first and second rigid sections, but only one or two layers joining the second to the third. A variety of configurations are available for this type of construction, but it is recommended to utilize an air-gap flex layer construction with this type of design to best meet IPC-2223C design guidelines.
FIGURE 5 shows an example of varying flex layer count. The first and second rigid sections have four layers of flex between them, but the second and third rigid layers have only two layers of flex. Layers 2 and 3 are flex and, although they do extend into the rigid section for routing purposes, they do not transcend between the two sections. The primary advantage of this is in the reduced flex section, given the number of interconnects does not require additional layers; the reduction down to only two flex layers significantly improves the bend capabilities of this type of construction.
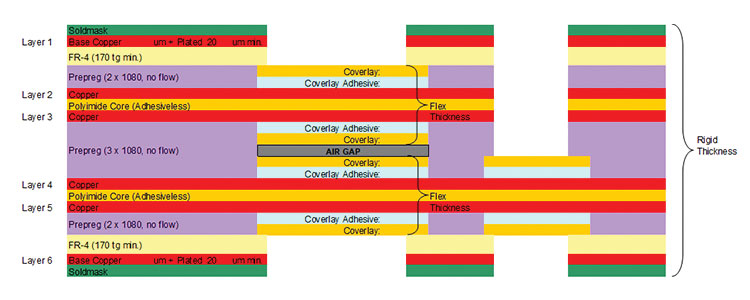
Figure 5. Rigid-flex PCB designed with varying flex layer counts.
Integrated ZIF tail constructions. Another very common rigid-flex circuit board stack-up is the integration of a ZIF tail integrated into the rigid-flex. This, in turn, eliminates the need for the ZIF connector to be mounted onto the rigid board and eliminates the need to have a separate flex circuit. This type of construction reduces the real estate requirements in the rigid area, if the part is a high-density design (where real estate is at a premium) or if it is a very thin design where the height requirements of a ZIF could not be incorporated.
This type of construction also has an element of improved reliability through the elimination of a connector in the rigid section and its associated points of interconnect. A wide variety of configurations are available.
FIGURE 6 is an example of a very straightforward three-layer PCB integrated ZIF tail construction. The ZIF tail extends to the right. This has the additional polyimide stiffener required to achieve the specific thickness in the ZIF finger contact area that is required by the ZIF connector.
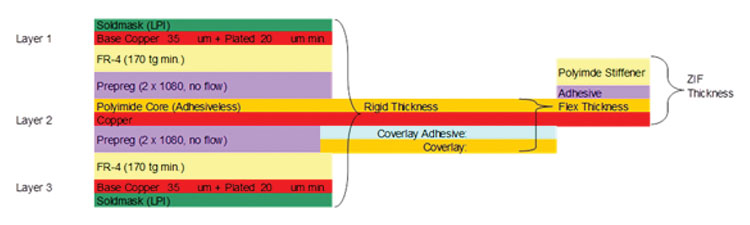
Figure 6. Rigid-flex PCB with an integrated ZIF tail construction.
This configuration can also be combined with multiple layers of flex – two, three, or even four layers. Four layers are the maximum practical limit, as it can become difficult to meet the ZIF thickness requirement. It’s most common to see one and two-layer flex configurations.
Rigid-flex circuits with blind vias and buried vias. The next type of rigid-flex PCB construction utilizes blind and buried vias. The applications are very similar to that of rigid circuit boards. They are typically driven by high-density BGA applications that require via-in-pad. This type of construction may also necessitate an asymmetrical construction if the blind vias are required to have an interconnect to the flexible circuit layers.
Configurations may be limited by the number of sequential lamination cycles the designs require. Multilayer rigid-flex PCBs can only accommodate a limited number of lamination cycles before dimensional tolerances of the materials and the manufacturing methods prevent layers from being effectively registered to one another, so there are some limitations. Just as in rigid PCBs, for via-in-pad applications, via fill and capping is available.
FIGURE 7 shows an example of a construction utilizing blind and buried vias. The blind and buried vias are shown in black in this stack-up. There is a blind via that goes from the first to the second layers, a buried via from layer 3 to layer 7. Last, a blind via comes “up” from the bottom from layer 8 to layer 7. This example is a symmetrical construction where the flex layers were centered in the material stack-up.
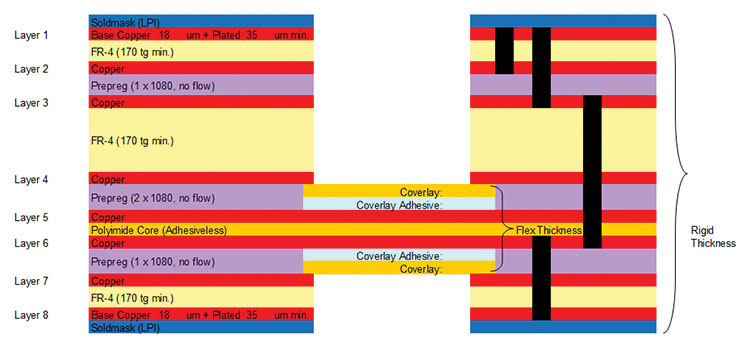
Figure 7. Rigid-flex PCB designed with blind and buried vias.
Flexible circuit with air gap constructions. An air gap construction has the flex layers configured as separate independent pairs. One of the primary advantages is substantially improved flexibility of the flex section. This applies only to designs that have more than two layers of flex, and is the preferred construction method for four or more flex layers, as it meets IPC-2223C. This type of construction results in no flexible adhesives present within the rigid areas, which ensures the reliability of the via structure and provides the highest degree of reliability both at component assembly and long-term operation of the design.
FIGURE 8 shows six flex layers, all configured with air gaps. Each flex pair has coverlay on both sides, then a small air gap. On the next pair, there is the same construction with two flex layer coverlays on both sides and so on, down to the third pair. This is considered a preferred configuration.
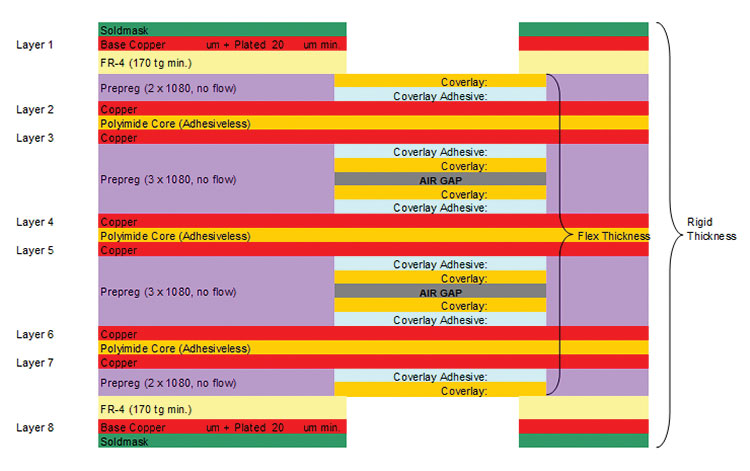
Figure 8. Rigid-flex PCB designed with an air gap structure in the flex regions.
If this design were attempted with all six layers bonded together, it would not meet IPC-2223C. There would likely be some very significant via reliability issues, and the flexibility of the flex section would be limited, almost to the point of being nonfunctional.
Multiple rigid area thickness construction. A board with multiple rigid area thicknesses is a very complex type of construction. While it can be manufactured, it is strongly recommended, where possible, to review alternative options with the supplier. This type of construction is practically limited to two rigid area thicknesses as a maximum. There may also be limitations as to what the rigid thicknesses can be due to the materials required for the construction. Ultimately, this is an expensive type of stackup, as it is analogous to manufacturing two boards to get one.
FIGURE 9 shows an example where the left-side rigid section is substantially thicker than the right-side section. Plated holes and vias are in both sections (although they are not shown in the left-hand section). The thinner section will have some limitations to its finished thickness, as there must be a degree of commonality in the materials. The prepreg thicknesses need to be the same on the left side as on the right. If there were an additional core on the right side, it would have to be mirrored on the left. Ultimately, the board will first be manufactured as a four-layer construction. This would encompass layers two through five, run all the way through to the end of the manufacturing process (drilling, plating, surface finish, solder mask, electrical test, etc.), but would not include creating the outer profile. The design would then be taken virtually back to the beginning of the process, where layers one and six would be added, and then run all the way through the process again, after which the final outer profile would be added. It is a very expensive process, but some applications demand it. Potential design alternatives can still meet the design requirements and will likely be less costly.
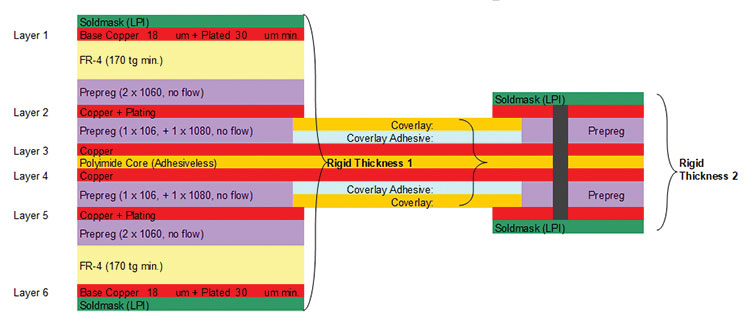
Figure 9. Multiple rigid area thickness construction.
Shielded flex layers construction. This last type of construction requires EMI or RF shielded flex sections. In this case, rather than copper layers, it utilizes specialized films that were developed specifically for shielding of flex circuits. The more common brand names we use are Tatsuta from Japan and APlus from China. These films allow for very effective EMI and RF shielding, without the added cost of copper layers, and allow for the benefits of reduced cost and a thinner flex construction for improved flexibility.
The flex area coverlays have multiple selective openings exposing the ground circuit. The films have an electrically conductive adhesive, so, once laminated, the adhesive extends into the coverlay openings and bonds onto the exposed ground, thus grounding out the shield layers.
FIGURE 10 shows a four-layer design with two layers of flex. In the flex area only, it shows the shield layers laminated to the external side of the coverlay. Again, this is a more cost-effective solution than adding additional copper layers and substantially increases the flexibility and mechanical bend capabilities of the flex layer.
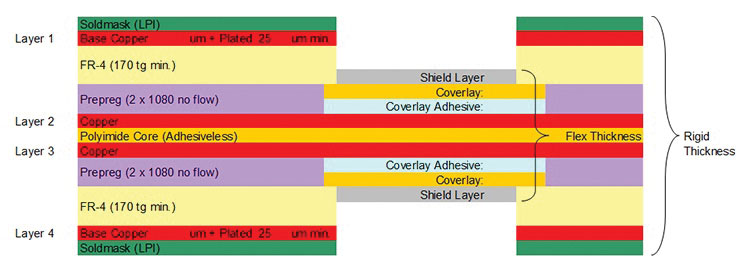
Figure 10. Shielded flex layer construction.
Summary
The combination of today’s rigid-flex PCB and flex circuit technology has created a variety of constructions that can add a significant amount of functionality, design integration and overall packaging reduction to a design. Most of the specific constructions reviewed here could also be combined to create an almost endless number of flex and rigid-flex circuit board configurations.
is product manager, flex and rigid-flex, Epec Engineered Technologies (epectec.com); This email address is being protected from spambots. You need JavaScript enabled to view it..


