Accursed Diode Marking

Always check the datasheet before marking a part.
Am I a broken record? Pretty much, especially when it comes to confusing diode marking.
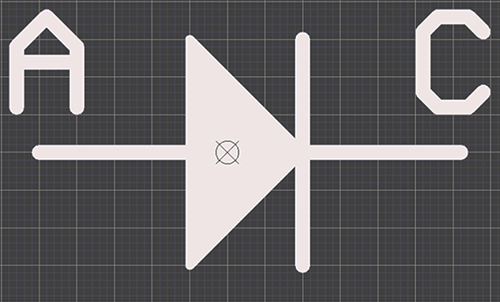
For example, everyone knows what the diode symbol looks like, and pretty much everyone knows which side is the anode and which is the cathode. Right? It’s just as in FIGURE 1.

Figure 1. Proper diode marking.
Is that big enough?
Normally, the clearest way to indicate polarity on an LED is to put something like this diode symbol in silkscreen next to, or between, the copper pads. In theory, that should remove ambiguity.
Ambiguity in marking is the enemy of polarized parts. Unfortunately, as I have noted in this space before (“How Should You Mark Your Diodes?” January 2015), LED manufacturers seem to conspire against us all when marking is concerned.
We recently ran across a case of built-in ambiguity. The PCB had what looked like a very clear marking. FIGURE 2 is from the assembly drawing, which is just a blow-up of the board silkscreen and documentation layer. With that marking, I’d quickly come to the conclusion that the anode is on the right, and the cathode is on the left. I’d even confidently state it’s a sure thing and extremely unlikely to cause any problems.

Figure 2. Markings per the assembly drawing. The anode appears to be on the right …
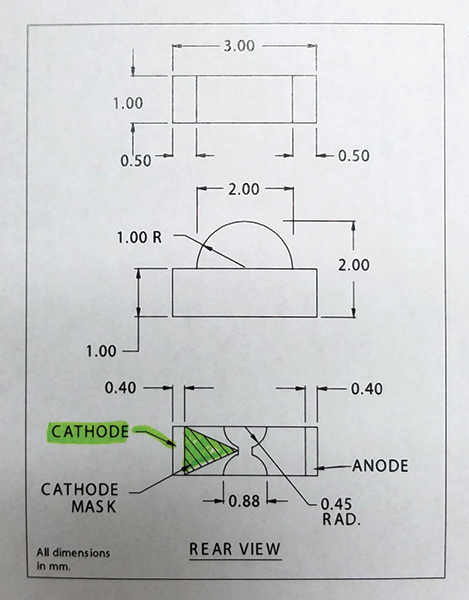
But … here’s where I’d be very wrong, and why it’s so important to always check the datasheet when dealing with diodes. Take a look at the following clip from the component’s datasheet (FIGURE 3). Look at the bottom of the image for the punch line.

Figure 3. … Except when the component datasheet says otherwise.
Wow. I can’t even ….
The board designer was just following the datasheet. That’s a perfectly proper thing to do, except when the manufacturer flips a coin, as appears to have happened here. In this case, dispense with the symbol altogether and use “A” for anode and/or “K” for cathode in the silkscreen. (Use “K” because “C” looks too much like a reference designator for a capacitor.)
is marketing manager at Screaming Circuits (screamingcircuits.com); This email address is being protected from spambots. You need JavaScript enabled to view it..


